 United Kingdom – Battlecruisers – Indefatigable, Australia, New Zealand
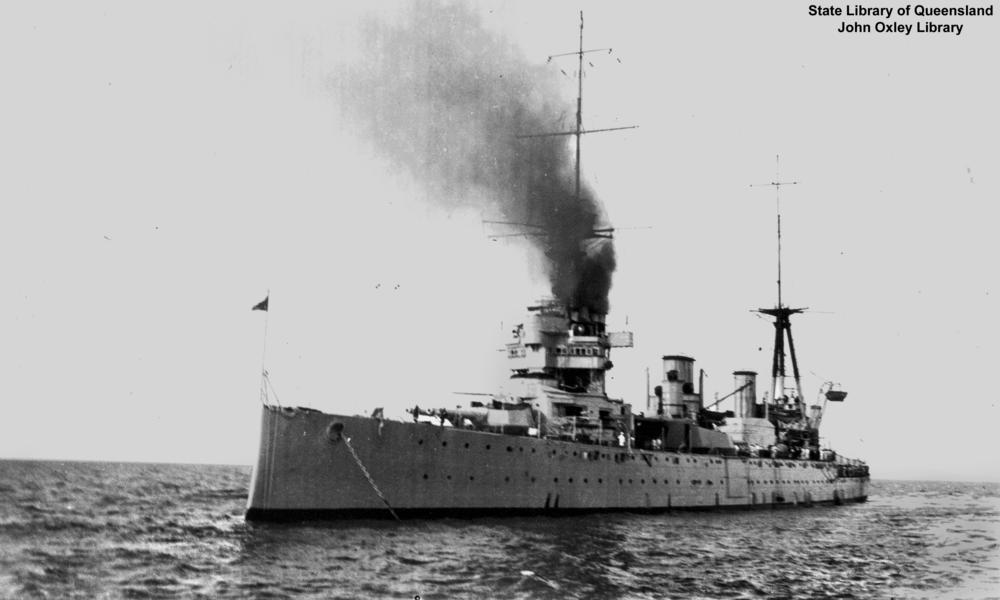
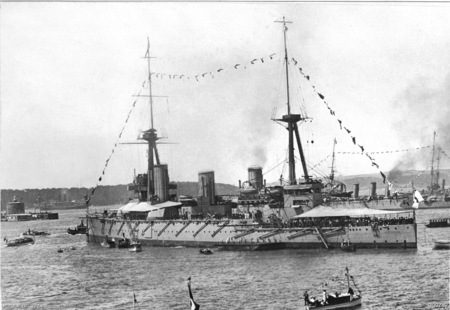
The Indefatigable class Battlecruisers were the second generation, after the Invincible, wanted by Jackie Fisher, accepted into the 1908 naval plan. The artillery plan mirrored that of HMS Neptune, albeit with improved cross-deck arc of fire for their midships wing turrets. They also had a getter range but kept the same protection. Construction also had utmost priority, and unlike the first three ships, two of these larger sister-ships were partly funded and crewed by Commonwealth sailors, as HMS Australia and New Zealand. The third, HMS Indefatigable, was famously sunk at Jutland as part of the 1st Cruiser Squadron of the Home Fleet under Admiral David Beatty. Thus, they left a mixed impression. Australia was the only battle cruiser seeing service in the Pacific as part of the hunt force for Von Spee’s East Asia Squadron. These ships saw action in the pursuit of Goeben and Breslau in the Med, the Battle of Heligoland Bight, Raid on Scarborough, and Battle of Dogger Bank in addition to Jutland. Both Australia and New Zealand survived the war, and were a subject of pride for their respective countries, further spurring their will to acquire their own navies.
Development
HMAS Australia
The Indefatigable were planned as successors to the Invincible-class battlecruisers, but many options were considered for the 1906 Naval Programme.
One winner was the X4 design: 22,500 long tons (22,861 t), 11-inch (280 mm) belt, 25-knot (46 km/h; 29 mph) speed.
However as it evolved the programme would comprised three Dreadnoughts, no battlecruiser.
The 1907–08 programme looked at proposals for new “armoured cruisers” as called until 1911, from 18,100 long tons (18,390 t) to 21,400 long tons (21,743 t). But battleships were again favoured, no battlecruisers ordered.
Indefatigable_class_battlecruiser_diagrams_Brasseys_1923
This changed at last in 1908, with a final design for what became the Indefatigable approved by the Admiralty was already. Fisher wrote in September 1908 he obtained an insurance by Sir Philip Watts plans for “A new Indomitable that will make your mouth water when you see it”. In fact, this became HMS Lion. In August 1909, the dominions met at the 1909 Imperial Conference and decided to finance their own ships under the guise of newly created indigenous fleets. At first, each was to have an Invincible-class battlecruiser, three light cruisers (Bristol class) plus six destroyers either financed or built locally. Their locations were Australia, New Zealand, Canada and South Africa, but they could be all recalled in home waters in case of war. Canada and South Africa rejected the scheme, not Australia and New Zealand and in between, the new Indefatigable, rather than the Invincible class. However, only Australia completely funded their namesake battlecruiser, and thus she became the flagship of the newly formed Royal Australian Navy. New Zealand contracted a loan to partially fund her own namesake ships, which was retained in European waters as a fully managed RN ship. From the 1909 conference, only the Australian squadron was born in 1913.

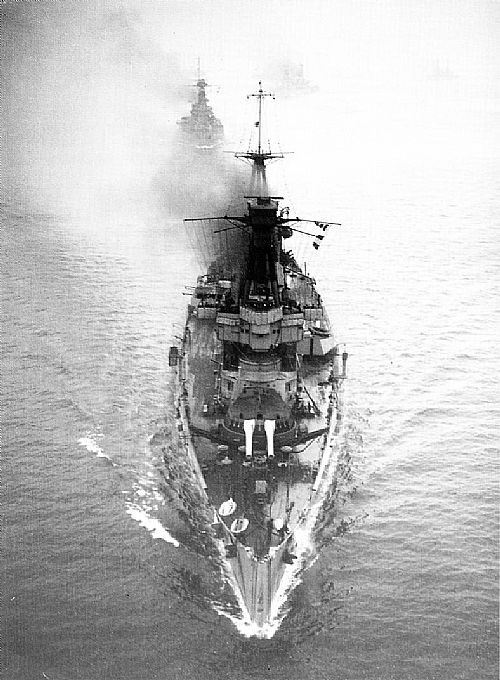
Indefatigable and Invincible to her left, colourized by Hirootoko Jr.
Commonwealth Battlecruisers: Acquisition
At the start of the century, the British Admiralty had localized naval defence forces in the British Empire, including the Dominions, and advocated they should be unified under the Royal Navy in case of war. Attitudes softened and by the 1909 Imperial Conference, the Admiralty proposed the creation of local Fleet Units comprising a battlecruiser, three light cruisers, six destroyers, and three submarines for fast actions in their respective areas and under general supervision of the RN. In this guise, the Dominions were encouraged to these fleet units to act as the core of potentially new national navies, notably Australia and Canada, the only one with the financial backbone to do it. It was less certain for New Zealand, still underdeveloped. Still, the latter, without popular support, was asked to partially subsidise a single ship for the China Station, with plans for South Africa to do the same also in later years.
The general plan was to have a “Home Fleet in miniature” under control of purchasing Dominion in peacetime, but transferred under overall RN control in wartime for coordination. They were also in that case susceptible to be merged to form larger fleets for regional actions. In the end, Canada refrained, with Australia being the only Dominion to purchase a full fleet unit. And the ship financed and donated to the RN.
New Zealand was asked to partially subsidise a fleet unit for the China Station and PM Sir Joseph Ward announced on 22 March 1909 that he would accept to fund a battleship, later changed to an Indefatigable-class battlecruiser, but for this, took out a loan to fund its cost. The naming initially was not the country’s name, like Australia, but rather another as the islands already had a battleship named after them, one of the King Edward VII-class battleship and in the end it was decided to de-baptize her and transfer the name to the new battlecruiser. Other suggested names were HMS Arawa, Caledonia, Wellington and Maori (a Tribal class destroyer, also to be renamed) with “Zealandia” eventually decided upon and approved by the King.
Controller of the Admiralty John Jellicoe wanted to have Australia and New Zealand constructed by the same shipbuilder to reduce construction costs and simplify administration and supervision, tenders issued early in 1910, with John Brown & Co. having the successful tender, however in the end there were simply capacity issues and New Zealand was instead assigned to Fairfield Shipbuilding and Engineering for an estimated cost of the latter at £1.8 million, included artillery and ammunition. Fairfield just completed HMS Indomitable, and thus could deliver a low cost estimate.
On 9 December 1909, Governor-General Lord Dudley cabled to the Secretary of State for the Colonies, Earl of Crewe the need to build locally also three Town class cruisers and an Indefatigable-class battlecruiser, a design selected “by default”, despite suspicions battlecruisers of the Kaiserliche Marine were superior protection. It seems this was dictated by old habits to have a station armoured cruiser or pre-dreadnought far from Britain, but perhaps also with some pressure from First Sea Lord and Admiral of the Fleet John Fisher.
The Australian Government was the only one to finance entirely this ship, with popular support, under the name “Australia” with the craft badge depicting the Federation Star overlaid by a naval crown and motto “Endeavour” to traduce the national spirit and attitude, as well in reference to James Cook’s HM Endeavour. On 6 May 1910, Australian high commissioner George Reid sent a telegram cable to the Australian Government suggesting instead the name King George V, but this was rebuffed. Bids started on 7 March 1910, until PM Alfred Deakin approved the submission by John Brown & Co. for both the hull and machinery (hence no Parsons turbines), Armstrong and Vickers for the artillery for a total cost of £2 million, contracts signed between the Admiralty and builders to avoid distant supervision and close watch on proceedings maintained by Reid and Captain Francis Haworth-Booth as a Naval Representative in London.
Australia, laid down at yard number 402 was later launched by Lady Reid on 25 October 1911 in a grand ceremony receiving extensive media coverage. She was the first to integrate nickel-steel armour plate unlike the two others, but only fitted in some sections and causing a delay of half a year. Final cost was £295,000. Meanwhile during construction, First Lord of the Admiralty Winston Churchill wanted the ship to remain if possible in British waters and possible replaced by another ship purchased with British defence funds but this was denied by then CiC Admiral George King-Hall for the Australia Squadron.
Design of the class


The Invincible (top) and Indefatigable (bottom). A similar general design, but the stretched central section with the Q and P turrets further apart is the main giveaway.
The Indefatigable were mostly designed as simple improvements of the Invincible class to gain time in design and construction. HMS Indefatigable herself was the only one ordered as per the 1908–9 programme, with the two others negotiated and built later for the Dominions. The general design was prepared in March 1908, the final design approved in November 1908. They were in the admiralty simply described as “enlarged Invincible” with the only sensible changes drawn from a longer hull, revised arrangements of protection and main armament. In short, a simple incremental improvement, leading to six battlecruisers (in 1913) of roughly similar design. The game changers were the next Lion class with their larger guns in a fully axial arrangement reflecting the Orion class dreadnoughts and their successors.
Hull and general design
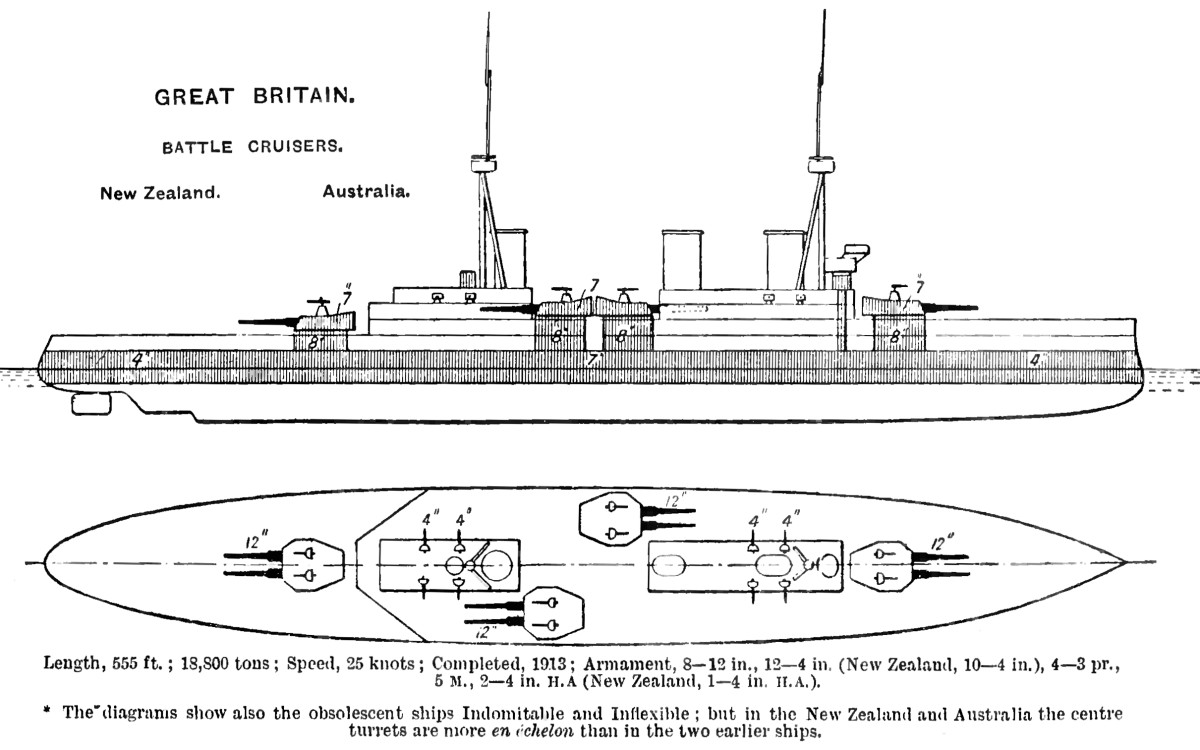
The Indefatigable were larger than the Invincible class, with an overall length of 590 ft (179.8 m) versus 567 ft (172.8 m) (o/a), a beam of 80 ft (24.4 m) versus 78 ft 6 in (23.9 m), and a draught of 29 ft 9 in (9.1 m) at deep load versus 30 ft (9.1 m). So what they gained in beam, they lost in draft, thus making them on paper faster with also a slightly better length-to-beam ratio. They displaced more as well, at 18,500 long tons (18,800 t) at normal load, 2,130 long tons (22,490 t) deep load, that is 1,500 long tons (1,524 t) more than the Invincible. Metacentric height was kept at 4.78 feet (1.5 m) at deep load.
As for the general design, they were roughly similar to the Invincible, but the central section was stretched out by almost eight meters (24 ft), allowing to push both wing amidship turrets P and Q further apart and thus, improve their arc of fire. The idea was to enable cross-fire in case of a broadside. The funnels were thus placed further apart, and instead of the fore and second funnels being closer, all three were now heavily spaced. The structures were also different, taller forward, with a double bridge (navigation and admiral placed atop) placed higher, above and below the conning tower, making for a more intimidating appearance, and still a tripod mast supporting the director forward, but the legs were arranged differently.
The other most distinctive feature after the three widely spaced funnels and amidship turrets well clear off for cross-fire wee the mast, much further apart. The aft mast supported no large spotting tower and thus, was a thick pole. The fore funnel was also raised before 1914.
Like their predecessors, the Indefatigable had no heavy secondary guns in casemates along the hull and rather lighter, intermediate QF guns located in the superstructure forward and aft. They had the same long forecastle starting sloping up towards the bow from the back of the forward structure and ended with a reasonable ram bow similar to the Invincible two anchors starboard, one port. The stern deck was short and “pointy”. The beam had an almost constant ellipse from prow to stern seen from above, apart a section of about 10 meters between “Q” turret aft starboard and “P” turret port forward, same management as for the Invincible. The Indefatigable also carried as delivered an anti-torpedo net on a series of spars. They were removed in 1914.
Greenwhich Museum Plans
Powerplant
Indefatigable had two Parsons direct-drive steam turbines housed in separate engine-rooms, to drove her four shafts. The wing shaft was coupled to the high-pressure turbine ahead, the astern turbines and low-pressure turbines to the inner shafts. These wing or outer shafts, for speed, drove a propeller 10 feet 10 inches (3.30 m) in diameter. The inner shafts, for cruise, were 10 feet 3 inches (3.12 m) in diameter. These Parsons turbines were fed by thirty-one Babcock & Wilcox water-tube boilers, located in five well separated boiler rooms, notably because the longer amidship section devoted for the P and Q turrets. This ensured survivability in case of hits.
HMS Indefatigable had turbines designed for an output of 43,000 shaft horsepower (32,065 kW), however on trials, they reached over 55,000 shp. (41,013 kW) on forced draught in 1911. The turbines of Australia and New Zealand were from Parsons as well, but more powerful for a total of 44,000 shp. (32,811 kW). All were designed for 25.8 knots (47.8 km/h; 29.7 mph), but reached 26 knots (48 km/h; 30 mph) on trials, which was better than many cruisers and armoured cruisers in service by 1912. To compare, the Invincible had also four steam turbines and 31 boilers, but for 41,000 shp (31,000 kW).
They carried approximately 3,200 long tons (3,251 t) of coal with a greater wartime maximal load, plus 850 long tons (864 t) of fuel oil to be sprayed on the coal to increase the burn rate, just like the previous Invincible. At full wartime coal and oil capacity, they were able to steam over 6,690 nautical miles (12,390 km; 7,700 mi) at 10 knots (19 km/h; 12 mph), much better than the Invincible, and their 3,090 nmi (5,720 km). The range was almost doubled, which was coherent with their use in distant stations while being able to steam back home in case of war. This was also handy for the wide expanses of the Pacific.
Protection
 This was in short, a repeat of the Invincible’s scheme, but with alterations, making it in some ways weaker when reduced in thickness in some places, but better spread out.
Main belt: 6 inches (152 mm) over 298 feet (91 m), 4 inches (102 mm) past barbettes, 2.5 inches (64 mm) ends.
Transverse Bulkheads: 4.5-inch (114 mm) aft, 3–4 inches (76–102 mm) forward.
Main barbettes:
Turrets: Front and sides 7 in (178 mm), roofs 3 inches Krupp KNC. Supporting beams for the roofs reinforced.
Main deck: 1 in (25 mm) nickel steel, 2 inches (51 mm) barbettes bases.
Lower deck armour: Nickel steel 1.5 in (38 mm) flat, 2-inches slope, more to the ends.
Forward conning tower: 10 in (254 mm). Communication tube 4 inches KNC.
Spotting tower: 4 inches (100 mm), roof and floor KNC 3 inches.
Torpedo director tower: 1 inch nickel steel.
Torpedo bulkheads: Nickel-steel 2.5-inch abreast the magazines/shell rooms.
Funnel uptakes 1.5 in nickel steel, sides 1 inch ends.
Australia and New Zealand differed in several aspects:
-The waterline ended 60 feet (18.3 m) short at the bow, 55 feet (16.8 m) at the stern.
-The sections abreast the barbettes were thickened to 5 inches (127 mm)
-The sections at each end were increased to 4 inches.
-The main deck armour was increased to 2.5 inches around the barbettes, extended 55 feet past the rear barbette.
-The lower deck armour was decreased from 1.5–2 inches to 1 inch, flat and slope
-The lower deck ends was thickened to 2.5 inches.
After Jutland 1 inch of armour was added to the magazine crowns and turret roof for 110 long tons (112 t) added to the design.
Armament
It was a repeat of the Invincible, apart for the torpedo tubes, reduced to two submerged ones instead of five.
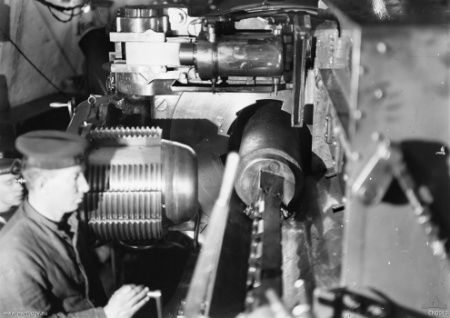
8x BL 12-inch (305 mm) Mk X Main Guns
 Each ship was fitted with four twin turrets for a total of eight BL 12-inch (305 mm) Mk X guns. The turrets were BVIII or later BVIII* (Australia/NZ), two in the axis, one fore and one aft cammed A and X and two wings turrets amidships en echelon between funnels, as ‘P’ and ‘Q’. The former was port, facing forward, the other was the starboard, facing aft. The way they were were staggered enabled them to fire in a 70° arc starboard for P, and same to port for Q. They could thus on paper fire cross-deck opposite either side, with less damage than the Invincible class.
The guns mounts enabled a depression to −3° and elevation of only 13.5° but later in the war, they were modified to allow 16° of elevation. Ammunitions were also shared with HMS Dreadnought, Lord Nelson class and Bellerophon class. They were 850-pound (390 kg) shells flying at a muzzle velocity of 2,746 ft/s (837 m/s). At max prewar elevation of 13.5° this means a range of 18,850 yards (17,240 m) with the 4crh shells. Rate of fire was two rounds per minute and in total 880 rounds were carried in wartime, 110 per gun.

16x BL 4-inch (102 mm) Mk VII Secondary Guns
The secondary armament comprised like for the Invincible, sixteen BL 4-inch (102 mm) Mk VII guns all in the superstructure, enclosed in casemates, and they obtained gun shields during 1914-15 refits. Two guns were however removed as well. They all had PII* mounts for a depression of 7°, elevation of 15°. They fired 31-pound (14 kg) shells at a muzzle velocity of 2,821 ft/s (860 m/s) for a max range of 11,400 yd (10,400 m). 100 rounds were provided per gun, thus 1,600 total.

Torpedo Tubes
The Indefatigable, Australia and New Zealand were equipped with two 18-inch (450 mm) submerged torpedo tubes, one on each side of the forward hull, and twelve torpedoes were carried instead of te five tubes in a lozenge plan for the previous Invincible.
Fire Control
The spotting tops at the head of the tripod fore and main controlled fire for the main guns at first. The was a 9-foot (2.7 m) Barr and Stroud rangefinder, whic data was input into a Dumaresq mechanical computer, electrically transmitted to Vickers range clocks in the Transmitting Station beneath each spotting top, converted into range and deflection data. It was graphically recorded on a plotting table for the gunnery officer to predict the targets movement. Connections could be made in any combination for damage resilience. Firing trials in 1907 revealed a vulnerability to gunfire on the spotting top. A splinter severed the voice pipe and all wiring running along the mast on the target ships HMS Hero, so “A” turret received a backup 9-foot rangefinder on her roof in a prewar refit.
Australia and New Zealand received instead an armoured spotting tower in the conning tower with improved field of vision while the transmitting station was deleted, the forward TS enlarged. But the “A” turret had the same rangefinder installed.
Later during the was they were fitted by a Dreyer Fire Control Table in 1915–1916 and a new director firing system (fire-control director transmitting training and elevation angles to the gun turrets via pointers). “Y” turret also ha a gun with transmitters as backup to be used as “directing gun” and this was installed on all three between mid-1915 and May 1916, so just before Jutland.
Author’s old illustration of HMS Indefatigable in November 1914.
Indefatigable specifications |
|
| Displacement | 18,500 t, 22,110 t FL |
| Dimensions | 590 x 80 x 27 ft (179,8 x 24,4 x 8,1 m) |
| Propulsion | 4 shafts Parsons turbines, 32 Babcock & Wilcox boilers, 44,000 shp |
| Speed | 25.8 knots (47.8 km/h; 29.7 mph) |
| Range | 6,690 nmi (12,390 km; 7,700 mi) at 10 knots (19 km/h; 12 mph) |
| Armament | 4×2 12-in, 16x 4-in, 4x 2-pdr, 2x 18-in TT (sub) |
| Armor | Belt 6 in, Battery 7 in, Barbettes 7 in, turrets 7 in, CT 10 in, decks 2.5 in. |
| Crew | 800 |
Modifications
HMS Indefatigable stern view 1909
Pre-Jutland
HMS Indefatigable was laid down and launched in 1909, completed in April 1911 while HMAS Australia was ordered in June 1913 and New Zealand in November 1912. The latter received a 3-in (76 mm) and a 6-pdr (57 mm) AA guns. The other two received a single 3-in (76 mm) gun AA in March 1915.
That single QF 3-inch (76.2 mm) 20 cwt AA gun was on a high-angle Mark II mount, with a maximum depression of 10° and a maximum elevation of 90°. It fired a 12.5-pound (5.7 kg) shell at a muzzle velocity of 2,604 ft/s (794 m/s) at a rate of fire of 12–14 rounds per minute. Maximum effective ceiling was 23,000 ft (7,000 m). 500 rounds were provided.
New Zealand had a single QF six-pounder (2.2-inch (56 mm)) Hotchkiss AA gun on a HA Mk.Ic mounting (October 1914 to November 1915). It had a maximum depression of 8°, maximum elevation of 60°, firing 6-pound (2.7 kg) shells at 1,773 ft/s (540 m/s) for a rate of fire of 20 rounds per minute, maximum ceiling 10,000 ft (3,050 m).
Post-Jutland
An additional 4-inch gun was also fitted on surviving ships in 1917 or post-Jutland, as heavy anti-aircraft (AA) gun delivered on a Mark II high-angle mounting that can elevation to 60°. It had a reduced propellant charge for a muzzle velocity down to 2,400 ft/s (730 m/s).
After the battle of Jutland as seen above, their protection was also altered, they received new modern searchlights, new enlarged fire direction post and a shorter, reinforced main mast. Their stern torpedo tubes were removed. A further 76 mm gun was added in 1917 and in 1918 a short take-off platform on the two central turrets, operating a Sopwith Strutter for reconnaissance and a Sopwith Camel for escort. In 1919-20, they received some changes to their AA artillery. Their career was active, but not especially memorable.
The Indefatigable class: Evaluation
This second-class of battle cruisers (1908 plan) was based on that of Neptune to the artillery configuration plan and still strongly resemble the Invincible, not only keeping their armour configuration, but also their faults. Construction in a short time was also justified for providing two first line ships for the Pacific Commonwealth navies, HMAS Australia and HMNZS New Zealand. They were the subject of some exaggerations both from Sir John Fisher in terms of firepower, as from Fred T. Jane in his review of the armour. In fact, they were neither faster nor better armed/protected. Additional length for the hull was meant to give more room for the central battery, allowing an easier broadside, unlike the Invincible.
For obvious reasons of smoke clogging the watcher’s view, it was made higher during testing, a modification applied in the yard for the other two. The problem was also the same with the rear tripod fire control, which was dismantled during the war on the three ships.
HMS Indefatigable was operational within the 1st squadron of battle cruisers, then was sent to the Mediterranean with the 2nd squadron of battle cruisers.
She participated in the hunting of the Admiral Souchon’s German squadron, and then served in the Aegean. She became Admiral Carden’s flagship, and was replaced by the HMS Inflexible.
Back to the Grand Fleet in early 1915 she was at the forefront of Beatty vessels during the Battle of Jutland in May 1916, taking several hits from the Von der Tann, including two in the ammunition rear turret bunker.
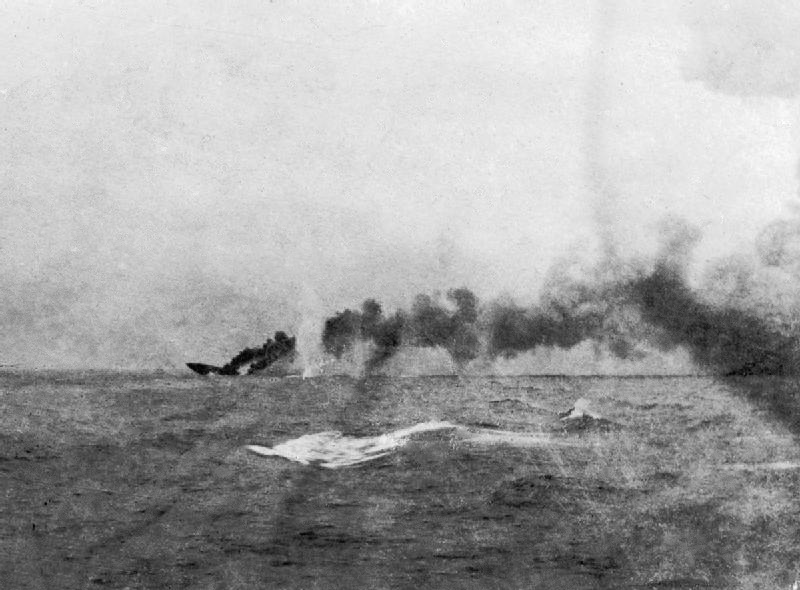
The hull broke up in two at the rear, and the ship quickly sank by the stern. Another salvo made explode central bunkers and the ship was literally blew apart and disintegrated in the world’s known the largest explosion at that time, leaving no chance to her crew.
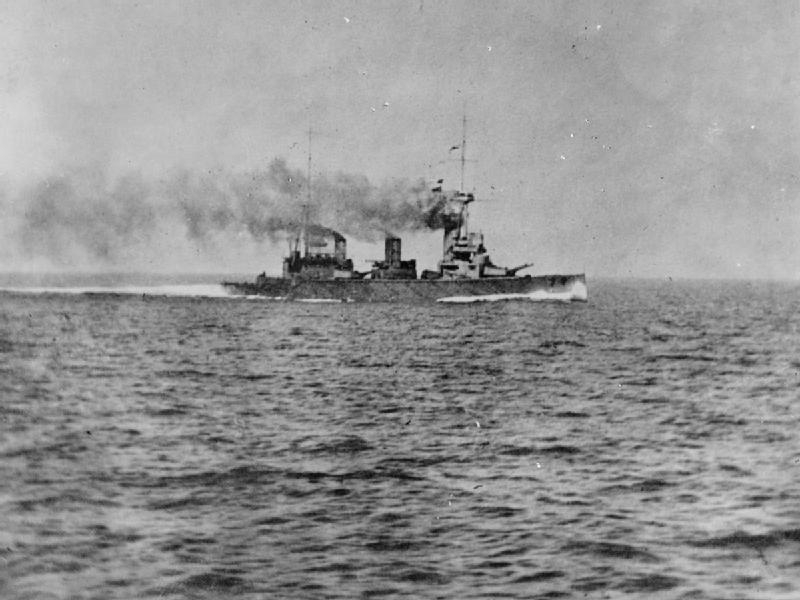
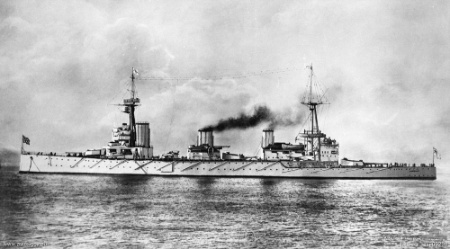
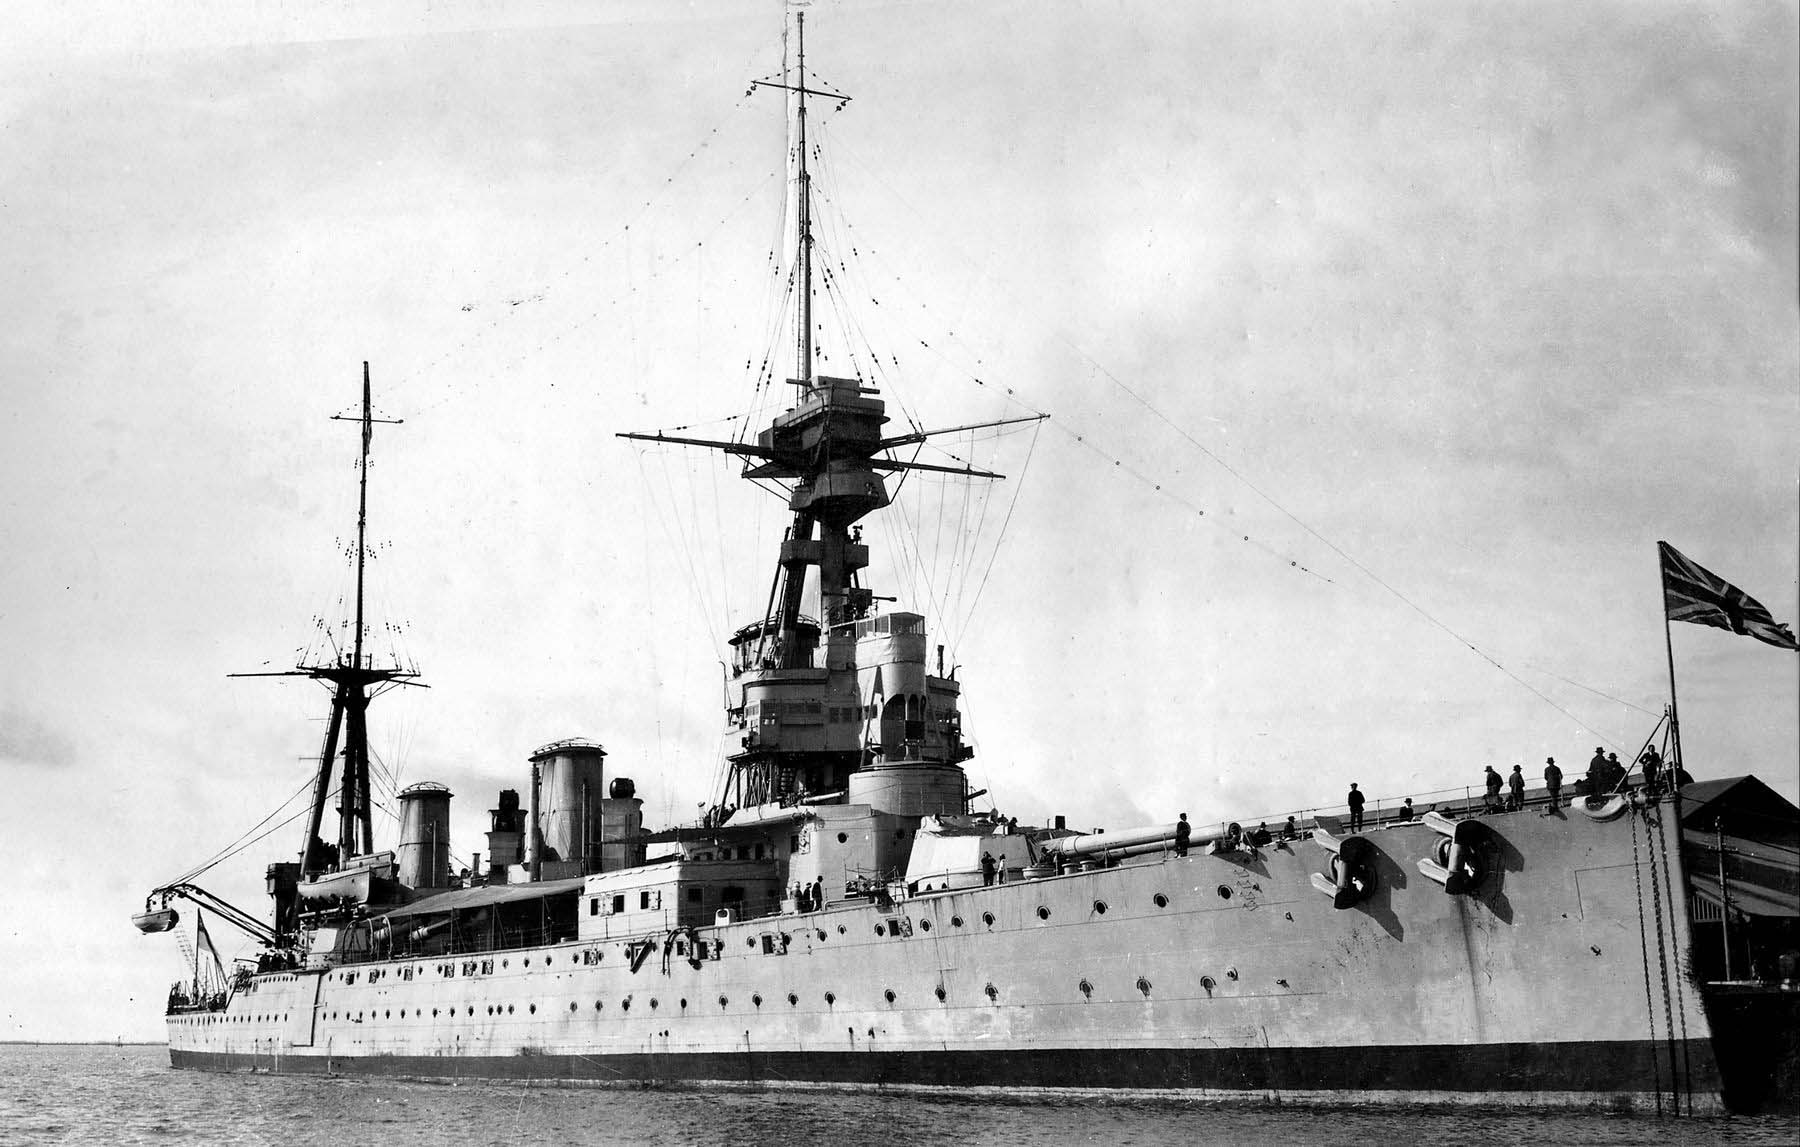
HMAS Australia at Sydney October 1913
HMAS Australia was sent to Australia where she became the flagship of the RAN (Royal Australian Navy). She was mobilized in a massive squadron combining Australian and New Zealander ships to prevent an incursion of Von Spee’s squadron in the South Pacific.
She participated in the Second Battle of the Falklands, still hunting down Spee’s ships, then returned to the Grand Fleet. She was not present at the Battle of Jutland, being repaired after a collision at sea with her sister ship New Zealand in April 1916.
She remained flagship of the 2nd squadron of battle cruisers until 1919 before returning to Australia and serve until 1922, but then was out of service due to compliance with restrictions of tonnage resulting from the Washington Treaty.
The Australian Government decided to scuttle her in a great ceremony held on April 12, 1924 in Sydney Harbour. Today she’s a large artificial coral reef teeming with life, and a major local touristic and diver’s attraction, a fitting end for such a steel grim reaper.
HMAS Australia
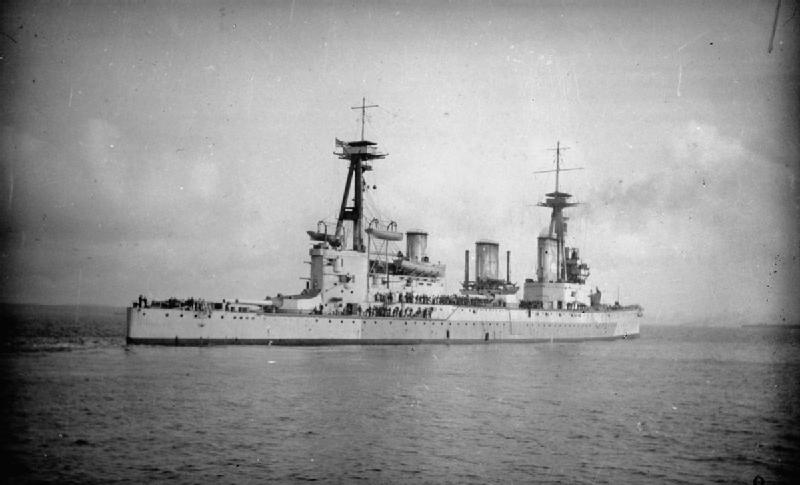
HMNZS New Zealand became the flagship of the small Royal New Zealand Navy (RNZN), but she was requisitioned after completion by the Royal Navy to bolster the Grand Fleet’s strength. She began touring the world as RN courtesy ambassador, then left for the Baltic in 1913.
She was flagship of the Admiral of the 2nd squadron of battle cruisers in August 1914. She fought in Dogger Bank carrying Admiral Beatty’s mark when HMS Lion was badly damaged and out of action. Furthermore, she collided later with Australia but was repaired in time to participate in the battle of Jutland.
She fired 420 shots but only scored 4 hits and in return was struck by a 280mm shell behind the rear turret. She made another cruise, carrying Admiral Jellicoe around the world in 1919, but was disarmed and BU under the Washington Treaty’s tonnage limitations.
Gallery

Date: May 2007
Equipment: Lanovia C-550 Scanner
Software Used: Adobe Photoshop CS2 9.0
This file is property of Archives New Zealand


 HMS Indefatigable
Indefatigable was laid down at Devonport Dockyard, with a contract for her engines to John Brown, Parsons for the turbines, on 23 February 1909, launched on 28 October 1909 and commissioned on 24 February 1911 at a cost of £1,536,769 or £1,547,500 depending on the sources. The guns alone cost £94,200. She was assigned to the 1st Cruiser Squadron, renamed from January 1913 the 1st Battlecruiser Squadron. C. F. Sowerby became captain on 24 February 1913 and by December she was transferred to the Mediterranean, with the 2nd Battlecruiser Squadron.
With Indomitable under command of Admiral Sir Berkeley Milne she met and shadowed SMS Goeben and the light cruiser Breslau (Souchon’s Med Sqn.) on the morning of 4 August 1914, heading east after a cursory bombardment of the Philippeville, French Algeria. Not being at war, Milne just could only shadow them as they headed back to Messina to re-coal.
Later they were able to break contact and war had been declared, however Italian neutrality prevented Milne to do anything but station Inflexible and Indefatigable at the northern exit of the strait, Gloucester at the southern exit, Indomitable being after sent to coal at Bizerte. On 6 August, the Germans exited south and headed east, trailed by Gloucester. Milne had its battlecruisers start instead at Malta, further confused by a message from the Admiralty stating that Britain was at war with Austria-Hungary, countermanded 4 hours later. Milne gave up the hunt for Goeben and headed for the Adriatic instead. On 9 August, he was ordered to resume the chase, but it was too late.
On 3 November 1914, PM Winston Churchill ordered an attack on the Dardanelles, led by Indomitable and Indefatigable, plus the pre-dreadnought battleships Suffren and Vérité. The intention was to test fortifications and response, and these were deceptively encouraging. A 20 bombardment saw a single shell hitting the magazine of Sedd el Bahr (tip of the peninsula), turning over 10 guns and killing 86 soldiers. This took place before the formal declaration of war on 6 November. Indefatigable remained until relieved by Inflexible on 24 January 1915, refitted in Malta and proceeding home on 14 February, 2nd BCS for patrols of the North Sea and temp. flagship of the 2nd BCS in April–May 1916, to replace HMAS Australia under repair.
On 31 May 1916, the 2nd BCS (New Zealand, flag, RADM William Pakenham, Indefatigable) was assigned to Beatty’s Battlecruiser Fleet in interception of the Hochseeflotte in the North Sea after decoding a message by room 40. Admiral Franz Von Hipper’s battlecruisers spotted Beatty’s ships at 15:20 and 10 min. the reverse was true, he also ordered the 2nd BCS in the lead to fall in astern of the 1st BCS while Hipper turned to starboard away of three light cruisers of the 2nd Scouting Group to catch up. Beatty later also altered course to the east, as he was unable to cut off Hipper. In the “Run to the South” Beatty changed course east south-east and closed to 18,000 yards (16,000 m) and a duel started with Lion and Princess Royal, then the formation was echeloned to the right, Indefatigable being in the rear, furthest to the west, New Zealand ahead of her. Indefatigable aimed at Von der Tann and New Zealand targeted Moltke.
By 15:54, the range was down to 12,900 yards (11,800 m), Beatty ordered 2 points to starboard, to open up the range, but 30 min. later at 16:00, Indefatigable was hit around the rear turret by two or three shells from Von der Tann. She fell out of formation to starboard, started sinking towards the stern, listing to port. Her magazines exploded at 16:03 after more hits, forecastle and forward turret. The forward section blew up, projecting large chunks 200 feet (61 m) into the air around. It was established long postwar that there was a low-order explosion in ‘X’ magazine, blowing up the bottom, severing the steering control shafts, and an explosion of her forward magazines by the second volley. Later archaeological evidence shows she was blown in half after fifty-two 28 cm (11 in) shells, well before the forepart detonated. Whatever the exact cause, she sank with almost all hands. Only three survived. Amazingly, Indefatigable’s captain, C.F. Sowerby, was found badly wounded but still alive. Two men were later rescued by S16, but Sowerby died of his injuries in between. Signalman John Bowyer was also later picked up by the Germans. As a wreck, the battlecruiser is today the Protection of Military Remains Act 1986. It was identified in 2001.
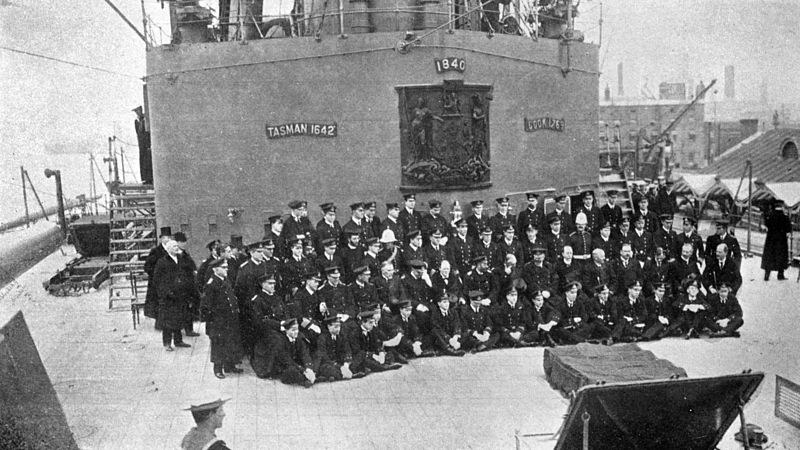
HMS New Zealand
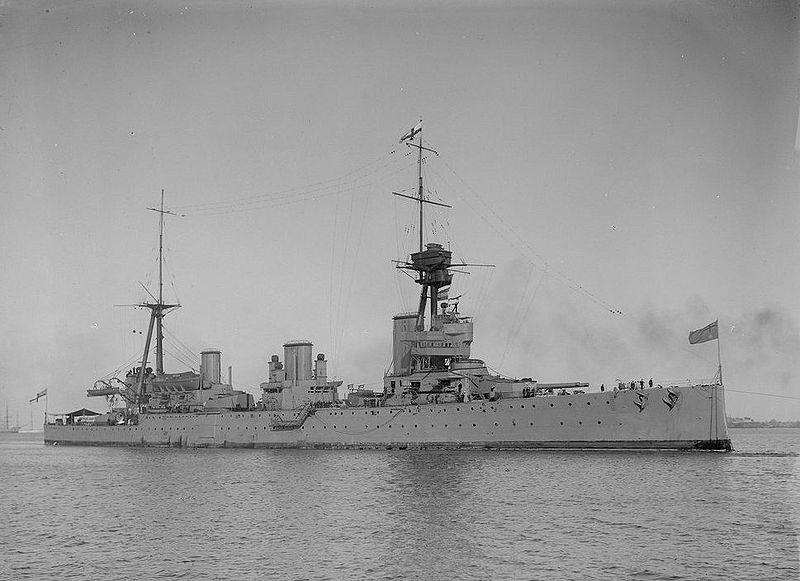
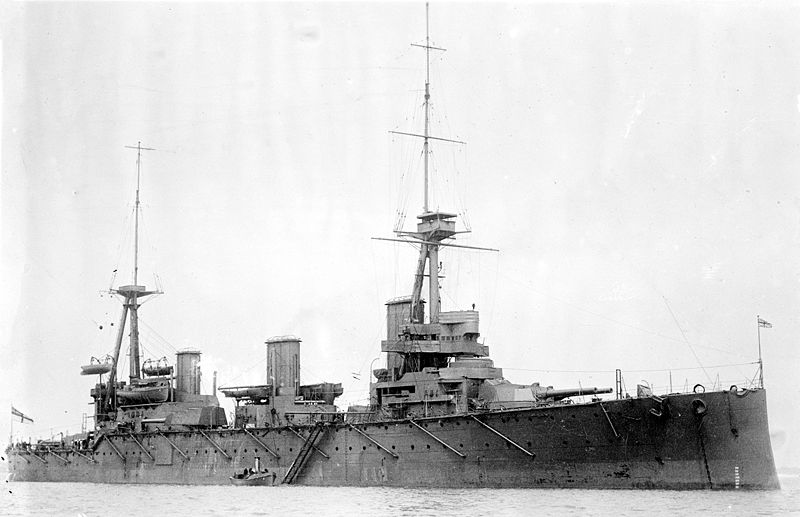
HMS New Zealand at Adelaide
New Zealand was ordered from Fairfield, Govan and her turbines from Parsons, she was laid down on 20 June 1910 and launched on 1 July 1911, commissioned in November 1912 at a global cost of £1,684,990 and the guns £94,200. In late 1912, so before even she was completed, it was agreed she would visit its donor country as a ‘thank you’ for funding construction, ending in Wellington for Xmas. The battlecruiser was temporarily detached from the 1st BS for this trip on 20 January 1913 under Cdr. Halsey in independent command. But the initial date of departure slipped into early 1913, and she was on Devonport on 28 January, heading for Portsmouth and on 3 February she received 300 expatriate New Zealanders under Sir Thomas Mackenzie (High Commissioner), and he unveiled her coat of arms gifted by the country’s expatriate community, followed by a visit by King George V and Winston Churchill, James Allen (NZ Minister of Finance and Defence) and other officials on 5 February 1913. After this, the battlecruiser took on coal and left on 6 February, stopped at St Vincent, Ascension Island, Cape Town, Simon’s Town, Durban on her way to Melbourne and then Wellington, New Zealand, on 12 April. She stopped in several ports and rallied tens of thousands of New Zealanders to visit “our Dreadnought”. She was the attention of dozens of events and festivities ending with a 11-day stay in the capital, then North Island, Napier, Gisborne and Auckland, then south, Lyttelton, Akaroa, Timaru, Otago Harbour, Bluff, Milford Sound, Greymouth, Westport, Nelson, Picton, and back to Wellington. On the West Coast, North Island, she stopped at Wanganui, Russell and back to Auckland on 21 June. Among others she received her naval ensign and a Union Jack, but also native gifts, two greenstone hei-tiki (pendants) to ward off evil and a Māori piupiu (warrior’s skirt made from rolled flax). It was fabled later this brought her luck as in three sea battles she would be hit only once, no one on board would be killed. She was notably visited by the Southern Māori MP, Taare Rakatauhake Parata while in Wellington on 19 April 1913 with a delegation of 25 leading Māori inc. members of parliament also on 21 April and received more gifts.
The battlecruiser later continued to maintain a close relationship with her donor country and citizens, regularly making headlines in the Dominion’s newspapers. She departed from Auckland on 28 June for Fiji and then across the Pacific via Suva and Honolulu, and docking on 23 July at Esquimalt, Vancouver Island in Canada. She stopped at Mazatlán, Acapulco, Panama City, Callao, Valparaíso, Punta Arenas, then crossed the Strait of Magellan to Montevideo, Rio Janeiro, the Caribbean and Halifax in Nova Scotia, and from there Portsmouth, arriving on 8 December 1913 after her first and last global cruise over 45,320 miles, consuming 31,833 tons of coal, hosting 500,151. This was the longest voyage of a capital ship in the dreadnought era.
Instead of remaining in the Pacific as originally planned, she was pressed to stay in British waters given the degrading situation, and the New Zealand Government acceded to the request. She joined the 1st Battlecruiser Squadron, Grand Fleet. She visited Brest in February 1914, Riga, Reval and Kronstadt in June and was visited by the Tsar and Tsarina on 27 June, hosting also a formal ball in conjunction with Lion moored alongside. On 29 June she headed home to be decommissioned on 30 August and transferred to the Mediterranean ad flag, Rear Admiral Archibald Moore, but this was cancelled.
Instead, on 19 August 1914, New Zealand was transferred to the 2nd Battlecruiser Squadron and her first wartime action was the Battle of Heligoland Bight on 28 August 1914 under Admiral David Beatty. She was in distant support for a cruiser-DD force deployed off the German coast and intervened when they failed to disengage on schedule at 11:35. At 12:37 New Zealand had fallen behind the three Lion class and never was able to participate in the battle. Her captain, Lionel Halsey, wore the Māori piupiu over his uniform, setting a tradition kept for the entire war. Later she was transferred to the 1st BCS, joining Inflexible from the Mediterranean. Next in the Raid on Scarborough, Hartlepool and Whitby on 3 November 1914 she was detached from the Grand Fleet in an attempt to intercept the returning German battlecruisers near Dogger Bank. Beatty did not receive the signal to their position, even though New Zealand had been specifically tasked to relay messages between destroyers and Beatty’s flagship. Warrender attempted a second time at 07:36, but only succeeded at 07:55 so that Beatty reversed course, sending New Zealand to search for SMS Roon. She was recalled to the squadron and turned west for Scarborough. Beatty’s faster ships started a pincer, heading to the north, Warrender passed to the south leaving a 15-nautical-mile (28 km; 17 mi) gap between them, in which the German light forces went through. A misinterpreted signal from the British battlecruisers created a confusion allowed the German light cruisers to escape, and alerted Hipper to the presence of British battlecruisers so they veered north-east and escaped.
New Zealand was flagship of the 2nd BCS, Grand Fleet on 15 January 1915 and eight days later, Hipper sortied to clear Dogger Bank of fishing boats and small craft collecting intelligence. Room 40 alerted Beatty, which sailed in intercept. New Zealand and Indomitable being the slowest they fell behind, despite maintaining 27 knots and she was able to catch and fire on SMS Blücher by 09:35, and after an hour, knocked out her forward turret, when Indomitable joined in at 10:31. They pierced her armoured deck, detonating an ammunition magazine four minutes later, and the fire amidships destroyed her two port 21 cm (8.3 in) turrets, damaged her engines so she fell to 17 knots, jammed her steering gear. At 10:48, Beatty’s signals were missed after a knocked out radio and smoke obscuring her signal halyards. So the battlecruiser instead saw the signals by Rear Admiral Sir Gordon Moore on New Zealand, and turned away from Hipper. In all, New Zealand fired 147 shells at Blücher before she sank at 12:07, finished off by Arethusa (other sources 151 shells, mostly HE, only 12 common) with Captain Halsey wearing the piupiu over his uniform. New Zealand was targeted but never hit again.
She was later relieved by HMAS Australia as flagship, 2nd BCS, on 22 February, and joined the Grand Fleet for their 29 March sortie, but the Germans withdrawn, she was back at Rosyth. On 11 April, the same when the Germans laid mines at the Swarte Bank, but they fled when a Zeppelin located the British light cruiser squadron. Heavy fog and the need to refuel caused Australia and other battlecruisers to be back on 17 April, then redeployed that night. Halsey became Commodore on HMS Iron Duke, succeeded as captain of New Zealand by J.F.E. (Jimmy) Green.
On the morning of 21 April, the 2nd BCS left Rosyth with the 4th Light Cruiser Squadron for the Skagerrak to stop the Swedish ore route to Germany. The planned destroyer sweep was cancelled as the High Seas Fleet mobilised for an operation in conjunction with the Irish Easter Rising. They headed for the middle of the North Sea (1st and 3rd BCs) and patrolled off Horn Reefs in heavy fog at 19.5 knots, Australia on the port flank. Submarine attack concerns urged Beatty to order zigzagging. It took some to relay this by signal flag down the line and as the weather worsened, Australia collided with New Zealand at 15:43. The flagship had her armour plate turned down close to P-turret, New Zealand turned away, and her outer port propeller damaged Australia’s hull below her Q-turret. A temporary loss of control placed her again in front of Australia, and she rammed her as she turned to avoid at 15:46, scrapping the side of New Zealand behind her P-turret. Both completely reversed and stopped just 30–40 yd apart to assess damage. New Zealand returned to Rosyth with the squadron, learning about a collision between Neptune and a merchant ship and HMS Ambuscade, Ardent and Garland with one another.
This caused Australia to miss the Battle of Jutland. New Zealand had a new propeller, in fact, Australia’s spare propeller stored at Rosyth so she was back at sea on 30 May, a day before Jutland.
On the 31st she departed with 2nd BCS as flagship New Zealand with Indefatigable. Later in the run, the 2nd BCS in the lead, fell astern of the 1st BCS when Hipper ordered a turn to starboard, away. Later was the “Run to the South” and fire was exchanged from 15:48. The formation was echeloned to the right with Indefatigable in the rear, the furthest New Zealand leading her. New Zealand disengaged when targeted SMS Moltke. By 15:54 at 12,900 yards (11,800 m) the range was opened at 15:57 but Indefatigable blew up and sank at 16:03. New Zealand shifted to Von der Tann, following Beatty’s instructions. Next, the 5th Battle Squadron appeared. New Zealand shift fire to Moltke and at 16:26, she was hit by a 28-cm shell from Von der Tann, on ‘X’ barbette, knocking loose a piece of armour jamming ‘X’ turret also blowing a hole in the upper deck. Later was spotted Vice-Admiral Scheer’s battleships. New Zealand, last ship in line, turned prematurely and was straddled by SMS Prinzregent Luitpold, but not hit. At 17:40 the duel resumed with the German battlecruisers under the setting sun. By 18:35 Beatty followed the Indomitable and Inflexible of the 3rd BCS when steering east-south-east while the Grand Fleet maintained pressure on Hipper’s battlecruisers and after two more turns the Grand Fleet crossed Scheer’s T, but Hipper escaped the trap. By 8:05, sight was lost. Latter they spotted the German battlecruisers again at 8,500 yards (7,800 m), Inflexible opening fire at 20:20, and New Zealand,

Indomitable concentrating on SMS Seydlitz, hitting her five times before she disengaged. After 20:30, they briefly spotted and fired at Rear Admiral Mauve’s II Battle Squadron, fire ceasing in the haze at 8:40. The run went on until 02:55 when the order was given to reverse course and head home.
New Zealand arrived in Rosyth on 2 June, dropping anchor at 09:55 and crew rested for 50 minutes before she started to refuelling with 1,178 tons of coal, replenishing ammunition with 480 twelve-inch shells until 03:30 on the following morning to prepare for another engagement that never came. In all she fired 430 12-inch shells in the battle, mostly from P-turret, showing their amidship guns were better placed. She was recorded only four successful hits, on Seydlitz (3) and SMS Schleswig-Holstein (1), about 1% accuracy. Apart X-turret damage, she was just bruised. A shell went through her silk jack, a splinter hit the ensign staff, No.3 cutter had its bow pierced, N°2 picket boat had three holed. Some jokingly referred as Captain Green worn piupiu for good luck during the battle.
She was relieved by Australia as flagship on 9 June, attached to the 1st BC until relieved by HMS Renown. She departed on 18 August with the Grand Fleet after a Room 40 warning on a raid on Sunderland on 19 August, but both Jellicoe and Scheer received conflicting intel and only Tyrwhitt sighted the High Seas Fleet. Later, New Zealand underwent a refit at Rosyth from November 1916 and temporarily replaced Australia as flagship from 29 November to 7 January 1917. On 1 October, Green was promoted to Rear-Admiral, replaced on 13 December by Captain Edward Kennedy, until 17 January 1918, replace in turn by Richard Webb, until September, when promoted to rear-admiral and Assistant High Commissioner at Constantinople. During her many days at anchors, many New Zealand soldiers on leave were invited to visit her. There was a mine laying action on Heligoland Bight in late 1917 and an operation planned for 17 November with the 1st Cruiser Squadron covered by the 1st Battlecruiser Squadron, itself backed up by the 1st Battle Squadron. In this Second Battle of Heligoland Bight, New Zealand did not fire a shot. She was used in 1918 to escort convoys to and from Norway. On 6 March, she supported minelayers. She made a sweep in the North Sea from 25 June or 26 June to late July. In September-October as part of the 2nd BCS she supervised and protected minelayers north of Orkney. Leonard Andrew Boyd Donaldson took over command and held it until 11 February 1919.
At the armistice, the battlecruiser had sailed 84,458 nautical miles in wartime, consumed 97,034 tons of coal, fired 664 main gun rounds in anger. She witnessed the surrender of the High Seas Fleet in November, with five soldiers from the New Zealand Division and a New Zealand newspaper reporter on board. She was specifically tasked of compliance with SMS Derfflinger respecting the terms of internment. By December, she carried convey Queen Maud and Prince Olav from Norway to UK. She was placed in reserve, with the NZ Gvt. Expressing the need for stopping military expenditure by mid-1919. New Zealand still carried Admiral Jellicoe on a victory tour to India and Australia, Canada, and New Zealand, also to coordinate their naval policies and defences. She was refitted between December 1918 and 11 February 1919 and recommissioned under command of Captain Oliver Leggett, leaving Portsmouth on 31 February 1919. While in the Bay of Biscay she was battered by a storm, destroying the accommodation for Jellicoe and staff as holes in the structure remained unsealed. She stopped at Gibraltar for repairs, first official visit of Jellicoe, then went to Port Said, taking 2,000 tons of coal, crossing the Suez Canal and taking Jellicoe onboard after his trip to Cairo and from the Arabian Sea reached Bombay on 14 March. She took 1,740 tons of coal and as repainted in the dockyard until 22 March. Furthermore, she visited Karachi and returning to Bombay, but crew got into trouble on shore leave so she sailed on 1 May for Columbo, taking a further 1,800 tons of coal, 700 tons of oil to cross the Indian Ocean to the Cocos (Keeling) Islands.
The crew could see there the remains of the light cruiser SMS Emden. She reached Albany in Western Australia on 15 May, disembarking Jellicoe and his staff. Via Perth, Melbourne and Hobart she had an exercise with the RAN prior to reaching Sydney, drydocked in Sunderland Dock, Cockatoo to be scraped and painted, refloated and coaled. She departed on 16 August for New Zealand and reached Wellington on 20 August just to be hit by an influenza pandemic. There was a medical inspection before anyone was allowed to disembark. In Wellington, she hosted some 50,000 New Zealanders. She was later in Lyttelton, dropped anchor off Picton on 13 September, North Island, Auckland while Jellicoe for six weeks visited ports and prepared his three-volume report for the government. The tour drew crowds wherever the ship went like in 1913 and Jellicoe was quite popular. Her in fact later became Governor-General of NZ from 1920 to 1924.
Leaving Auckland on 3 October and heading via Suva, Fiji and Samoa, firing her 12-inch guns to entertain the local chiefs, she headed for Hawaii via Christmas Island just to save three marooned men since the war had broken out. She arrived in Canada on 8 November, docking at Esquimalt with Jellicoe which started on 20 November a tour of Canada and the US by train. It was planned they would met again at Key West. HMS New Zealand proceeded south via San Diego, the Panama Canal, Caribbean, Havana, Jamaica, Port of Spain (Trinidad) and arrived at Key West on 8 January 1920 to pickup Jellicoe and returned to Portsmouth, reached on 3 February after a 33,514 nautical miles. Jellicoe was promoted Admiral of the Fleet and so wahs greeted by a 19-gun salute from HMS Victory upon arrival.
On 6 February, New Zealand was tugged to a mooring on the Hamoaze, the crew sent on leave, 250 remaining under Lieutenant Commander Alexander David Boyle for basic reserve care. Leggett was replaced by Hartley Russell Gwennap Moore on 11 March, until July 1921. Paid off into reserve on 15 March 1920, the battlecruiser was regarded as obsolete by the RN. Recommissioned on 1 July 1921 with a reserve crew she replaced HMS Hercules as flagship, Rosyth, under Captain Ralph Eliot, her last captain until 1 September. She was sold for scrap with Agincourt and Princess Royal to J&W Purves (Exeter) under the restrictions of the Washington Naval Treaty and need to occupy unemployed dockworkers at Rosyth. She was BU by A. Wallace Cowan at Rosyth, a proces complete by September 1924. The company recovered 40,000 tons of steel, 10,000 tons of armour plating, 3,000 tons of coal and the salary price, £20,000 returned to the NZ government which completed pating for the load on the 1944/45 financial year.
HMS Australia
Australia was laid down at John Brown, Clydebank on 23 June 1910, launched on 25 October 1911 and completed on 21 June 1913 for a global cost estimated to £2,000,000 (Gillet).
She sailed for Devonport by mid-February 1913 for acceptance trials also of guns, torpedoes, and machinery, but she needed two hull plates, damaged during launch, to be replaced. Australia was commissioned and boarded by Rear Admiral George Patey, first Rear Admiral Commanding Australian Fleet, as his flagship. At launch, her crew was 820, half RN personnel, the other Australian-born RAN personnel or British nationals transferred to the RAN. Accommodation areas were crowded, and the ventilation system was soon flagged as inadequate for Australia. Still, she was the largest warship in the Southern Hemisphere when delivered. She hosted several official events like 30 June, King George V and Edward, Prince of Wales for a farewell visit in which George knighted Patey, a first since Francis Drake. On 1 July, the ship under sir Patey hosted a luncheon with imperial dignitaries, and 600 Australian expatriates invited to a ceremonial farewelling. She departed for Australia, escorted by HMAS Sydney and on 25 July, sailed for South Africa, planned to stop at The Cape to reinforce the link between the two nations. She remained at Table Bay from 18 to 26 August for parades and receptions, as well as Simon’s Town and Durban. She arrived at Jervis Bay on 2 October to take the head of the RAN fleet (cruisers Encounter and Melbourne, destroyers Parramatta, Warrego, and Yarra) for a grand formal fleet entry into Sydney Harbour, on 4 October.
Furthermore, she then visited all major Australian ports, each time gathering a massive audience, an event filmed on board by late 1913 on “Sea Dogs of Australia” with first screening in August 1914. In the previous July, Australia was in a training cruise in Queensland waters and on 27 July, she was informed the British Admiralty thought war was imminent. She was soon recalled to Sydney to take on coal and stores and on 3 August, the RAN was placed under Admiralty control. She was sent to reinforce the China Station, and allowed to seek out and destroy the German East Asia Squadron under VADM Maximilian von Spee. The latter was aware of the Australian squadron and planned to harass British shipping in the Pacific.
War was official on 5 August, the RAN had departed Sydney a night before, and headed for German New Guinea, with a plan for the Australians to seize Rabaul. Captain Patey planned to clear the harbour, but the battlecruiser was to hang back to intercept SMS Scharnhorst and Gneisenau if present, lured out by smaller vessels sent in reconnaissance. This was done on 11 August, but the harbour was empty. Next, Australia searched the nearby bays and coastline and returned to Port Moresby to refuel.
By late August, Australia and Melbourne escorted a New Zealand occupation force to German Samoa. She left Port Moresby on 17 August, met by Melbourne en route on the 20th and escorted the troopships Moeraki and Monowai, with the French cruiser Montcalm, three old British Pelorus-class cruisers, but the grounding of Monowai delayed the expedition until 23 August. They arrived at Fiji on 26 August, Apia early on 30 August, a city which surrendered without a fight so they could proceed to Rabaul after mustering forces in the Louisiade Archipelago on 9 September with he cruisers Sydney, Encounter, destroyers Parramatta, Warrego, and Yarra, submarines AE1 and AE2, auxiliary cruiser HMAS Berrima, store ship SS Aorangi, three colliers, one oiler. On 11 September, two picket boats secured Karavia Bay, and later they captured the German steamer Sumatra off Cape Tawui. The German colony was captured, and the fleet departed on 15 September back to Sydney.
Von Spee withdrew meanwhile from the region except from SMS Emden tasked to create a diversion and prey on British shipping in the Indian Ocean, the appeared at Samoa on 14 September, and attacking Tahiti. Meanwhile von Spee sailed to South America, and plan to make it in the Atlantic and return if possible to Germany. Patey on 17 September was tasked to protect the Australian expeditionary force and on 1 October, still with the cruiser Sydney, Montcalm, Encounter was off Rabaul before being warned of the Tahiti attack. They patrolled around Fiji, Suva on 12 October, and remained four weeks patrolling Fiji, Samoa, New Caledonia.
In fact, Patey had predicted, that von Spee would continue east. This traduced into the disastrous Battle of Coronel. Underway on 8 November, she coaled from a pre-positioned collier on 14 November, reached Chamela Bay, Manzanillo, Mexico, 12 days later. This multinational squadron was to prevent the German squadron to reach Canadian waters or following it through the Atlantic via the Panama Canal or Cape Horn. His force comprised also the cruiser HMS Newcastle, Japanese cruisers Izumo, Asama, and battleship Hizen. They reached the Galápagos Islands on 4-6 December. Next they investigated the South American coast from Perlas Island down to the Gulf of Guayaquil. In December, Von Spee was defeated off the Falklands by a British fleet and Patey learned of this 10 December, while off the Gulf of Panama.
Planned as the flagship of the West Indies Squadron, tasked to hunt down German vessels evading the North Sea blockades, she passed Jamaica and approached the Panama Canal, but sailed down the coast of South America instead due to the heavy merchant traffic and went via the Strait of Magellan on 31 December 1914, a first for the RAN. She had a propeller damaged, and arrived at the Falkland Islands at half speed for temporary repairs, departing on 5 January. She was signalled a probable German cruiser late but was unable to hunter her due to her propeller, albeit managed instead to spot a former German passenger liner, naval auxiliary Eleonora Woermann, firing a warning shot from “A” turret, caused her to stop and be captured. The German crew were taken aboard and she was sunk. After the Battle of Dogger Bank, Australia was prepared to join a Battlecruiser Sqn. wit the Home Fleet. On 11 January she was diverted to Gibraltar and then to Plymouth, and started a refit from 28 January until 12 February, sent to Rosyth on 17 February. She became flagship of the 2nd BCS, Grand Fleet on 22 February. Vice Admiral Patey took command before being reassigned to the West Indies, replaced by Rear Admiral William Pakenham. She was part of patrols of the North Sea area and did some escort work, but declared upon arrival some 259 cases of respiratory illness, due to the Aussie crew not used to the cold weather, followed by a measles epidemic in June 1915. The fleet appointed a senior fleet surgeon to assist the medical crew.
She took part in a sortie on 29 March, and back to Rosyth. On 11 April, same after the Germans laid mines at the Swarte Bank. On 26-28 January 1916, her unit sortied to the Skagerrak while the 1st Light Cruiser Squadron.
On the morning of 21 April 1916, she left Rosyth with the 4th Light Cruiser Squadron for the Skagerrak, tryn to stop the Swedish ore route to Germany. Underway her unit learned about the High Seas Fleet mobilizing for a raid. They sailed for a rendezvous point in the middle of the North Sea, with the 1st and 3rd BCs and Grand Fleet south-eastern end of the Long Forties.
At 15:30 on 22 April, the three squadrons of battlecruisers patrolled on the north-west of Horn Reefs when heavy fog came down so they reduced speed to 19.5 knots, Australia port flank. They later started zigzagging after U-Boat reports, but signalling errors led to a collision with HMS New Zealand (see above). Long story short, she had her side torn open from frames 59 to 78 close to P-turret and her hull damaged below her Q-turret. It was later blamed on Procedural errors. She assessed damage but while it happened some off watch Australian sailors managed to find a potato locker and started hurling these and insults at the crew of New Zealand… Both were soon underway to Rosyth.
This event forced HMAS Australia to long repairs, so she missed the battle of Jutland, with temporary repairs at Devonport from 6 May. She was visited by Australian Prime Minister Billy Hughes with the High Commissioner. Repairs were completed on 31 May, and she’s sailing west about round Ireland to arrive at Scapa Flow at 06:30 on 3 June, then back to Rosyth on 9 June.
On 18 August, she sortied to counter a German raid to Sunderland on 19 August, botched due to conflicting intelligence.
The year 1917 was spent in boring exercises and patrols into the North Sea, with few incidents. In May while preparing for action stations, a 12-inch shell became jammed in the shell hoist and the magazines were evacuated. Lieutenant-Commander F. C. Darley climbed down the hoist, successfully removed the fuze. On 26 June, she was visited by King George V. On 12 December she collided with the battlecruiser HMS Repulse, causing three weeks of repairs (December 1917 to January 1918). During that time, she was equipped with a fly-off platform to launch a Sopwith Pup from her quarterdeck, on 18 December. On 30 December, she spotted and shelled a suspected submarine contact.
Later, she made test-launches with a Sopwith 1½ Strutter.
In February 1918, volunteers were called upon from all crews for a daring mission, the raid on Zeebrugge using blockships. Many Australian volunteered to escape their boring routine, but only 11 personnel were selected for the raid on 23 April. One was an artificer engineer, posted to the engine room of the requisitioned ferry HMS Iris II. Others were in the blockship Thetis, and a few took part in the storming party along the mole, without any casualties and one DSC, three DSM and dispatch mentions. They were also listed for the Victoria Cross.
1918 saw HMAS Australia in convoy escorts between Britain and Norway, like on 8-21 February and from 6 March with the 1st Battlecruiser Squadron, supporting minelayers. On 8 March on, she made further aircraft launches with platforms mounted on ‘P’ and ‘Q’ turrets. She sortied on 23 March 1918 to counter a convoy to Norway. On 14 May, she launched a fully laden Strutter aeroplane for reconnaissance, and a Sopwith Camel fighter as complement to defend the latter, and operated them routinely until the end of the war. She made one last mission in the North Sea on 25-26 June and 29–30 July, but by September-October, she protected mine laying operations north of Orkney.
From 11 November 1918 she saw little activity, with the highlight of escorting the Hochseeflotte to internment in Scapa Flow on 21 November, and she was tasked to guard the battlecruiser SMS Hindenburg for her trip to Scapa Flow, assigned later as guard ship. This was interrupted by a gew patrols in the North Sea, causing low morale among many sections of the crew. She was at last formally farewelled by the Prince of Wales and First Sea Lord Rosslyn Wemyss and in April 1919 she left Portsmouth for home with HMAS Brisbane (first leg) as the latter was detached to tow the submarine J5. The battlecruiser entered Fremantle on 28 May 1919, but remained under Admiralty control until 1 August. She was retroactively awarded the battle honours “Rabaul 1914” and “North Sea 1915–18” on 1 March 2010.
Low morale was constant since she entered service, and the battlecruiser saw more disciplinary charges in World War I than any other vessel in the RAN or for her type. Harsh punishment were also to blame, like a sailor charged with desertion for staying out too late on Armistice Day (three months prison and no pay…). One factor was frustration at not participating in the Battle of Jutland, as well as high rates of illness and limited leaves, poor-quality food. From May 1919 the battlecruiser was met with extensive hospitality in Australia, and after tours, the crew as in a long and well deserved but short shore leave. She sailed for Melbourne under captain Cumberlege pressing the crew for a tight schedule of “welcome home” port visits, but at 10:30, between 80 and 100 sailors returning stood in assembly, refusing to work.
The executive officer managed to resolve the issue, but later stokers abandoned the boiler rooms, delaying her departure by an hour. Later 5e men (including a Victoria Cross nominee from the Zeebrugge raid) were charged with inciting a mutiny, arrested, court-martialled aboard HMAS Encounter on 20 June in Sydney. They were jailed at Goulburn Gaol for a year and eighteen months, or two and hard labour. There was debate among the public, media, and within government and 10 September the Navy announced the sentences were halved “on consideration of the sailors’ youth” but controversy went on until 21 November until the Australian government pressured the Admiralty until the charges were dropped, and the sailors released on 20 December. Rear Admiral Percy Grant and Commodore John Dumaresq resigned in protest, but later withdrew their resignations after receiving assurances the Board would be consulted by the government in the future regarding the RAN. The Battlecruiser took part in celebrations in May 1920, making more aircraft launches. The latter was stored on the quarterdeck next to ‘Q’ turret, deployed and recovered by derrick. She was reduced to non-seagoing status in September and due to post-war budget cuts from August she was almost last in RAN priorities, reduced to the Flinders Naval Depot as gunnery and torpedo training ship, to provide coastal artillery backup, and was back to Sydney in November 1921, paid off into reserve in December.
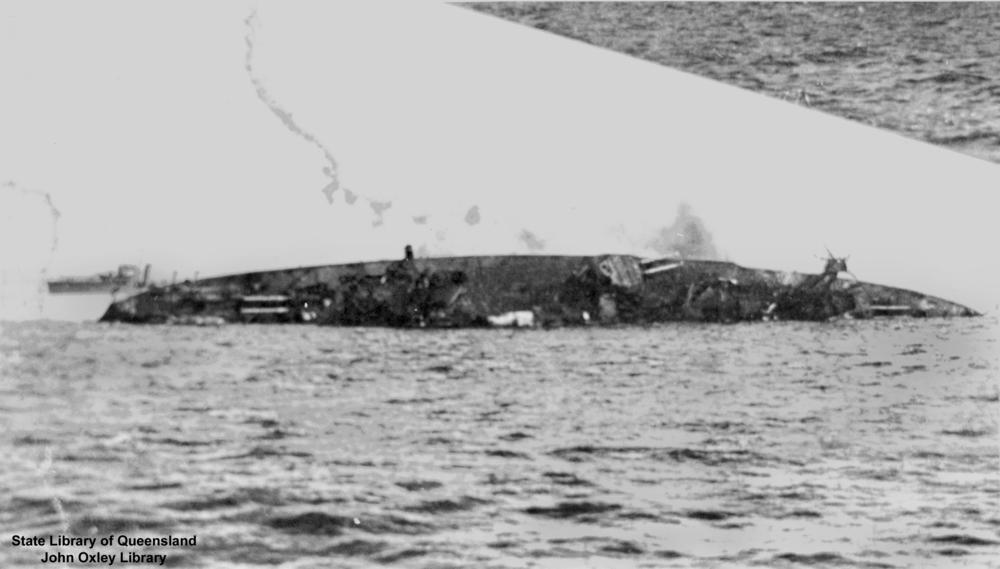
With the 1922 Washington Naval Treaty she was affected by it, decommissioned in 1921, equipment removed and after November 1923 it was decided to have her scuttled and until January 1924, some £68,000 of equipment was reclaimed. No consideration was given to recycle her 12-inch guns in coastal fortifications, since the ammunitions were considered obsolete and no longer procured in the UK. The scuttling proceeded on 12 April, with the British Special Service Squadron, 25 nautical miles (46 km; 29 mi) northeast of Sydney Heads. She was sunk at a point deep enough to never refloat her, escorted by the HMAS Melbourne, Brisbane, Adelaide, Anzac, and Stalwart plus the British Special Service Squadron, civilian ferries with passengers as a farewell, and many personnel volunteered for the scuttling party. Charges were detonated at 14:30, seacocks opened before she was abandoned, but it took 20 minutes for her to sink, with the list increase until her main guns broke free and rolled overboard, before she capsized and sank stern-first until 14:51. Brisbane fired a 21-gun salute. She went under 270 metres. Rediscovered in 2007 with US help and surveyed. It was discovered that after hitting the seabed, she slid about 400 metres (1,300 ft) to her final resting place, now protected under the federal Historic Shipwrecks Act 1976.

HMS New Zealand in tow at Portsmouth, by William Lionel Wyilie 1911
Src
Books
Bell, Christopher M. & Elleman, Bruce A. (2003). Naval Mutinies of the Twentieth Century: An International Perspective. Frank Cass.
Brown, David K. (1999). The Grand Fleet: Warship Design and Development 1906–1922. Naval Institute Press. (NIP)
Burt, R. A. (2012) [1986]. British Battleships of World War One (Revised ed.). NIP
Campbell, John (1986). Jutland: An Analysis of the Fighting. NIP
Campbell, N. J. M. (1978). Battle Cruisers. Warship special. Vol. 1. Conway Maritime Press.
Carlyon, Les (2001). Gallipoli. London: Transworld Publishers.
Cosentino, Michele & Stanglini, Ruggero (2016). British & German Battlecruisers: Development and Operations. NIP
Friedman, Norman (2014). Naval Anti-aircraft Guns and Gunnery. Seaforth Publishing.
Friedman, Norman (2011). Naval Weapons of World War One: Guns, Torpedoes, Mines and ASW Weapons of All Nations; An Illustrated Directory. Seaforth Publishing.
Hythe, Viscount, ed. (1914). The Naval Annual 1914. Brassey’s.
Gillett, Ross (1977). Warships of Australia. Rigby Limited.
Jose, Arthur W. (1941). The Royal Australian Navy, 1914–1918. Official History of Australia in the War of 1914–1918, Volume X
Lambert, Nicholas (1996). “Economy or Empire?: The Fleet Unit Concept and the Quest for Collective Security in the Pacific, 1909–14”.
Massie, Robert K. (2003). Castles of Steel: Britain, Germany, and the Winning of the Great War at Sea. Random House.
Parkes, Oscar (1990) [1966]. British Battleships, Warrior 1860 to Vanguard 1950: A History of Design, Construction, and Armament (New & rev. ed.). NIP
Preston, Antony (1985). “Great Britain and Empire Forces”. In Gray, Randal (ed.). Conway’s All the World’s Fighting Ships 1906–1921. NIP
Roberts, John (1997). Battlecruisers. Naval Institute Press.
Tarrant, V. E. (1999) [1995]. Jutland: The German Perspective: A New View of the Great Battle, 31 May 1916. Brockhampton Press.
Admiralty, Gunnery Branch (1917). The Director Firing Handbook. O.U. 6125 (late C.B. 1259). Copy No. 322 National Archives at Kew.
Links
dreadnoughtproject.org
http://www.navy.gov.au/
https://www.navypedia.org/
The Indefatigable class on wikipedia
commons.wikimedia.org/
Videos
Model Kits
on scalemates.com/
sdmodelmakers.com/