 Australian Navy (1928-55): HMAS Australia, Canberra.
The Australia class were the only heavy cruisers in Australian History. Both were replacement for much older light cruisers. They were ordered in 1924, based on the Kent class (first of the County class). HMAS Australia and Canberra were probably among the most battle hardened Royal Australian Navy (RAN) large vessels. They were also the only ones launched in Scotland in 1927 and completed the next year, both transferred to Australian waters and staying there apart alternated deployments to the China Station.

HMS Australia in October 1937
From July 1940, HMAS Canberra became a convoy escort between Western Australia, Sri Lanka, and South Africa until mid-1941. She then started a campaign against German auxiliary cruisers. However when Japan attacked in december 1941 she was quickly reassigned to convoy duties around New Guinea, with operations in Malaysia and Java, before joining Task Force 44 taking part in the Guadalcanal campaign and Tulagi landings. She met her fate on 9 August 1942, barely surviving the Battle of Savo Island, until evacuated and scuttled in Ironbottom Sound. Her sister Australia ….
Development
The County class were the first British cruisers designed under the shadow of the Washington Treaty, discussed and signed in 1922 and adopted in 1923. By default of capital ships, no under severe cotas with a moratory, this long range heavy cruiser had to replace them to protect British trade lines around the globe and associated colonial Empire. They were fast, large and roomy, with four twin turrets for the new 8-in caliber also used on the later Exeter class and post-treaty cruiser projects. The County class comprised three sub-classes, Kent, London and Norfolk.

HMS Kent as completed with her “eastern station” peacetime colors.
Already it was planned by the Australian Government, which acquired, manned and financed sizeable ships pre-WWI, like the Indefatigable class battlecruiser Australia completed in 1914. Budgetary constrains would have her decommissioned in 1921, so in 1924, as part of the new five-year plan to develop the RAN, the Australian government ordered two Kent-class cruisers to replace the old light cruisers Sydney and Melbourne. It was understood that manning a battlecruiser in wartime made sense, but not in peacetime. Maintenance costs were difficult to justify, albeit part of the population wanted her to stick around as flagship. The need to replace much older cruisers made more sense.
These newly built heavy cruiser would be named HMAS Australia and Canberra, and both built by John Brown & Company, at Clydeband in Scotland, the only County-class cruisers ever built there.
HMAS Australia was ordered in 1924 and laid down on 26 August 1925, then launched on 17 March 1927 at a ceremony where the bottle was broken by Dame Mary Cook, wife of Sir Joseph Cook, Australian High Commissioner, former Australian PM. She was initially fitted with short funnels, but sea trials and other Kent-class showed smoke affected the bridge in a tail wind, as well as the aft control position in other occasions. A classic occurence that led to a fix at berth, raising the funnels by 15 feet (4.6 m) and this was done also on her sister HMAS Canberra while she was near completion.
 The design of her badge was a matter for debate, as on 26 December 1926, Richard Lane-Poole (commander of the Australian Squadron) and William Napier (1st Naval Member of the Australian Commonwealth Naval Board) both disapproved of the design ingerited from the battlecruiser Australia. They insisted for a new one and by 26 July 1927, the Coat of arms decided upon was the state Australian crest as basis, with the shield bearing symbols of all six states as well as the Federation Star crest, but no motto was given. This badge design modified again and modenrized when applied to the next 1983 HMS Invincible, initially to be renamed HMAS Australia with the motto “Endeavour”, until the deal fell through. HMAS Camberra was commissioned on 24 April 1928 and for Austrlian taxpayer it was worth 1.9 million pounds, close to the initial estimated cost.
HMAS Canberra was laid down on 9 September 1925 under the yard number 513 at the same yard, and launched on 31 May 1927 by Princess Mary. Thus, she became the first ship of the RAN launched by a member of the Royal Family. Fitting out was completed on 10 July 1928, and on the 11th she was commissioned into the RAN in another ceremony. Her crew mostly came from for the former cruiser HMAS Sydney and her cost had been around 2 million australian pounds, greater than her sister. She also had her funnels raised before completion as seen above.
Design of the class
Hull and general design

Plans of HMS Kent
The two cruisers were County/Kent-sub class ships, announced and calculated to be 10,000 tons standard, just at the treaty limit. On this tight fit, despite a length way superior to an Indefatigable class battlecruiser (179,8 meters or 590 ft overall) at 590 ft (180 m) between perpendiculars and 630 ft 4 in (192.13 m) overall, she had a beam of 68 ft 3 in (20.80 m) and a draught on 21 ft 4 in (6.50 m). The County class were asthetically pleasing ships, with long, flush-decked hulls starting with a moderately angled prow, knuckle, and ending on an invertely sloped pointed stern. There were portholes all long the hull on two stages, which, added to the three raked funnels and two raked masts almost gave them the appearance of liners. This was even compounded by their peacetime 1920s livery for some, a white hull and yellow/buff funnels and some structures or all vertical structures, the so-called “eastern colors” (see below).


The County/Kent and Australia class shared the bare appearance of the early class, with four main turrets generously spaced, a long central structure from B to X superfiring turrets from which emerged the tall bridge, then three funnels, and the rear bridge, then aft mast. Both masts were composed of three stages and raked, carrying high the wireless radio cables. The forward one had a topped, semi-enclosed spotting top with intercom, the aft one had gaff for hoisting the main battle flag. They had ten service boats, all on decks with rotating davits, with two yawls, four motor cutters, and two whalers and two pinnaces. Since the officer’s quarters was located at the poop, it was adorned on the very furst ships with an old style gallery, not installed on Australia and Canberra however.
The bridge, also used on the later HMS York, was a tower composed of a first conning tower level, topped by the main enclosed bridge with generous triangular wings, then the support for a wider open bridge, that could be topped by a tarpaulin in hot climates, and surrounded by windows and binoculars. Behind was located a second squared fire control tower with a secondary enclosed observation bridge and topped by a new open observation deck with the fire control system in the center. This could be used as an admiral bridge for command and control as well. It seems however Australia as completed had a standard all light gray livery, and her upper bridge wings were quite large and linked to the lower wings with braced struts. She also carried carlin boats and had two side telemeters on the upper wings for her AA guns, located on sponsoned positions amidships. Both cruisers had three anchors, and the crew amounted to 815 or more as the years progressed, with AA additions and later radars. This seems enormous to modern standards and it is, but their roomy hull compensated a bit for that, albeit they were still considered cramped and not overly popular.
Powerplant

The Australia class did not differed from the Kent class in that they had four propeller shafts, with fixed-pitch 3-bladed bronze propellers, drive in turn by four sets of Curtis high-pressure and Parsons low-pressure geared turbine, fed in turn by eight Yarrow superheated boilers running on fuel oil. The ensemnble made for an impressive 80,000 shaft horsepower for the time, and thanks to their excellent beam/lenght ratio, they could hold a top speed of 31 knots (57 km/h; 36 mph) but were much faster on trials. The usual speed fell down to 25 knots in common service, but their range was still 2,270 nautical miles (4,200 km; 2,610 mi) at max speed which was very impressive. Thie put them at range of New Guinea and the Solomons from the northern Australian coast in less than a day. On economical speed of 11 knots (20 km/h; 13 mph) they could reach 10,000 nautical miles (19,000 km; 12,000 mi), putting them on range of most areas in the Pacific.
Protection

Cutaway of a Kent class, armour design
Being heavy cruisers if the 1st generation meant if a sacrifice was to be made on the eternal trilogy between speed, firepower and protection, this was the latter that was downgraded in order to fit in the allocated tonnage. Even though it was reasonable for the time, not “tin-clad” like Italian and French cruisers of that era. They were supposed not to stop shells from other heavy cruisers, but of light cruisers and especially destroyers. Here is the scheme:
Magazines and machinery spaces/protective deck: 1.5 to 3 inches (38 to 76 mm)
Turrets: 2 inches (51 mm) face and side.
Conning tower: 3 inches (76 mm) walls
Anti-torpedo bulges
Belt armour: 4.5 inches (110 mm) installed in 1938–39.
The hull form for its the cross-section recalled the schemes of Courageous and Hood with a waterline trapezoidal section for protection, transferred to blisters below. Their box-shaped armour protection was concentrated around vital places. The underwater protection comprised bulges 76 mm (3 inches) deep. It was 1.6m on British cruisers. Magazines were protected by 111 mm with a sandwich of 102mm armour (4 inches) over the original 9mm (0.3 inches) plating and they had 25mm (0.9 inch) sides and 76-25mm (3 in-0.9 in) for the platform deck. Machinery was protected by 25mm (0.9 inch) bulkheads and 32mm (1.25 in) deck. The steering gear compartment was protected by 38-25mm (1.5-0.9 in) horizontal protection.


HMAS Camberra 1940, and 1941


Various appearances of HMAS Australia from completion to 1944
Armament

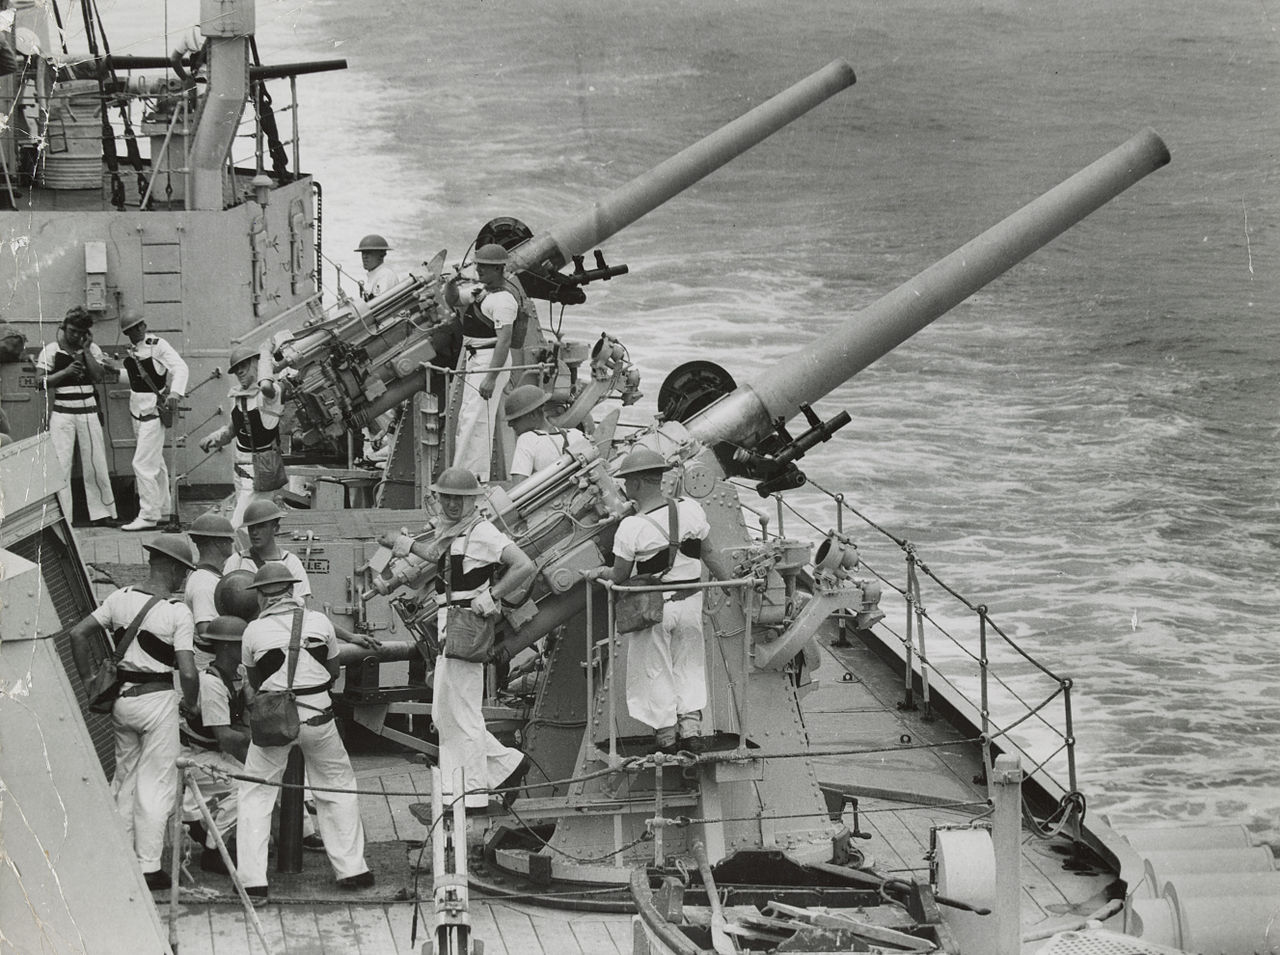
At launch the cruisers were completed by four twin turrets for 8-inch (203 mm) guns fore and aft (never changed). They were completed by four 4-inch (102 mm) anti-aircraft guns located amidship, without protection, and four single 2-pounder (40 mm) pom-poms of the 1918 pattern. In complement were four quad mounts for .303-inch machine guns so sixteen Vickers machine guns total. The secondary A/S asset were their two quadruple 21-inch (533 mm) torpedo tube sets located on deck either side. There also four vintage 3-pounder (47 mm) saluting guns, not detailed here.
BL 8-inch/50 (203 mm) Mk.VIII, Mt.Mk.I

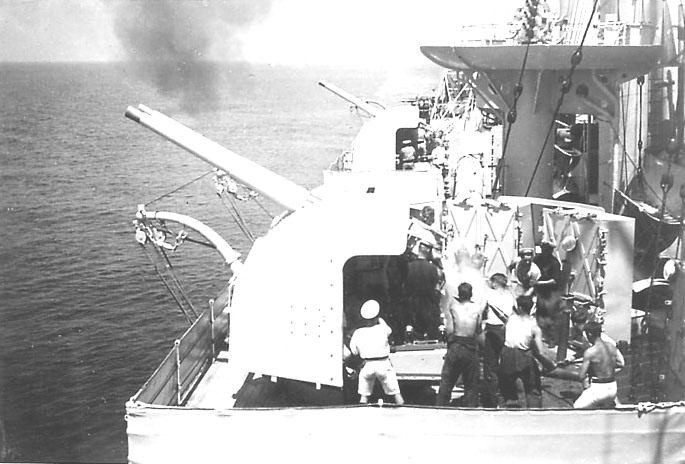
HMAS Australia firing her forward guns, maximal elevation was 70°.
These guns were the largest authorized by the Washington Treaty. Developed from 1920, they entered service in 1927. A total of 168 were manufactured, enough for all County class, York and Canarias class cruisers.

Specs:
Mass 17.5 tonnes, barrel 400 inches/10 meters 50 calibres.
Shell: 256 pounds (116 kg), mv 2805 feet per second (855 m/s).
Maximum firing range: 28 kilometres (17 mi).
QF 4-in/45 (102 mm) Mk.V, Mt. HA Mk.III
These original four QF 4 in Mk.V (102 mm L/45) guns, in single mounts HA (High Angle) Mk.IV. They were heavy, unprotected ww1-1 era naval guns, weighting with barrel & breech: 4,890 lb (2,220 kg). They used an horizontal sliding-block with a recoil hydro-pneumatic/hydro-spring 15-in (380 mm) system and mounting dependent traverse and elevation. Their muzzle velocity however seen sufficient at 2,350 ft/s (716 m/s) up to 16,300 yd (15,000 m) in horizontal, anti-ship fire and 28,750 ft (8,800 m) in AA mode and max elevation. Controlled by the HACS director on the bridge.
QF 4-in/45 (102 mm) Mk.16, Mt. HA Mk.19
Mk. XIX high/low-angle guns, in four twin mounts, installed in the cruiser’s refit. Used the well protected twin mountings HA/LA Mark XIX better suited to combat. The deck where the former single mounts rested needed to be reinforced and braced for the new turrets, almost twice as heavy. Manually loaded, this was an issue as the shells were heavy, tiring the men quickly.
QF 2-pdr/39 (40 mm) Mk.II pompom, Mt. HA Mk.I

The ships were completed with four single 2-pdr/39 Pompom QF Mk II, replaced in wartime when possible by Octuple mounts.
Specs:
Shell: 2 lb. (980 g) or 1.8 lb. (820 g) HV
Performances: 115 rpm fully automatic at 2,040 ft/s (622 m/s) or 2400 ft/s (732 m/s) for HV
Effective Range: 3,800 yards (3,475 m) or 5,000 yards (4,572 m) HV, Ceiling HV: 13,300 feet (3,960 m)
QF 0.5-in/50 (12.7 mm) L/50) Mk.III, Mt. Mk.I

The quad QF 0.5-inch Vickers Mk III were tandem mounted heavy machine guns, four in a row with two coordinated operators side by side manning wheels for traverse and elevation. There was a pair of targeting spidewerb style sights, and reload was by heavy drum magazines.
specs:
63 pounds (29 kg), excluding 10 pounds (4.5 kg) cooling water, 52.4 in (1.33 m) long, barrel 31 in (0.79 m)
Cartridge 12.7×81mm 0.5 inches (12.7 mm) mv 2,540 feet per second (770 m/s) ceiling 9,500 feet (2,900 m range 4,265 yards (3,900 m)
21 inch (533 mm) Torpedo Tubes
Two twin banks amidship on deck, QR Mk VII model and firing Mark 9 torpedoes. It Entered service in 1927. Specs:
-Weight: 3,452 lb (1,566 kg) for a 21 ft 7 in (6.58 m) long body, 750 lb (340 kg) TNT warhead, contact fuse.
-Range and speed: 5,000 yd (4,600 m) at 40 kn (74 km/h), unique setting.
Sensors
Type 241 surface search radar: On Canberra in May 1941.
Type A290 air-warning set: On Canberra in May 1941.
Type 286 radar: Early VHF band 1940 radar, no rotation. FRQ 214 MHz,PRF 200-800 Hz, pulsewidth 2 µs, peak power 6 kW, range 25 nm (46 km)
type 285: Gunnery radar, installed in WW2 for the main guns. FRq 600 MHz, Beamwidth 18°/43°, Pulsewidth 2 μs, range 18,000 yd (16,000 m), altitude 15,000 ft (4,600 m), accuracy 150 yd (140 m), peak power 25 kW.
Type 284 radar: Replacement for the 285 on top of the main FCS turret. UHF. FRQ 600 MHz, PP 25 kW, range 10 nm (18 km), later ported to 27 km.
Air Group

Initrially the Kent class carried no aircraft. Gradually in the interwar they were modified to do so. In the Australia case, both in the interwar (c1928, then 1935) had a catapult added. It changed twice for Australia, and the latter likely carried a Supermarine Seagull III (1928–1936), the ancestor of the Walrus, and the latter from 1936 until removed in 1944 with better radars. Her sister carried likely the Hawker Osprey floatplane for a time.
Seagull, Osprey and Walrus

Depending on sources, these cruisers had either the Hawker Osprey or Supermarine Seagull III as service seaplane, before settling on the Supermarine Walrus Mark I in 1939. The Supermarine Seagull Mark III was the first common Australian floatplane in service with HMAS Albatross, an interwar Australian seaplane tender, and found on cruisers and operating from land bases. The Hawker Osprey was carried by some County class cruisers, but it remained unsubstantiated for HMAS Canberra. The Supermarine Walrus was a slow, but rugged and long range observation seaplance that was particularly helpful in the context of the Pacific. It seems apart the catapult there was no permanent shed to protect it. It was usually stored on the catapult, ready to launch when not in maintenance, and could be craned to safety in heavy weather due to the risk of toppling over.

Pre-serie Walrus called the Seagull Mark V in RAAF service. The RAN was too small to have its own naval aviation arm, these aircraft were operated by the RAAF command. They were deployed also from HMAS Sydney, Hobarth, and Perth. Canberra’s catapult operated a Supermarine Seagull Mark V (Walrus) amphibian aircraft of No. 9 Squadron, RAAF.
⚙ specifications (1928) |
|
| Displacement | 10,000 tons standard |
| Dimensions | 630 ft 4 in x 68 ft 3 in x 21 ft 4 in (192.13 x 20.80 x 6.50 m) |
| Propulsion | 4x props, 2x Curtis HP/Parsons LP geared turbines, 8× Yarrow boilers: 80,000 shp |
| Speed | 31 knots (57 km/h; 36 mph) |
| Range | 2,270 nm (4,200 km) 31 kts or 10,000 nm at 11 knots. |
| Armament | 4×2 8-in, 4×4-in DP, 4×2 pdr pom-pom AA, 4×4 .303-in HMG, 2×4 21-in TTs, see notes |
| Protection | Belt 4.5 in, CT 3 in, Turrets 2 in, Deck 3 in |
| Air Facilities | 1 catapult 1935*, Seagull II, Walrus. |
| Crew | 815 (variable during career) |
*Australia only
Modifications

HMAS Australia in 1944, dark grey livery
Armaments wise, this changed a lot. In 1934 already both received two extra quad mounts Vickers 0.5-in/62 HMGs. The next year, Australia saw the installation of a catapult amidship of the S-II-L type (explosive type) for an Hawker Osprey seaplane. Between 1935 and 1939, HMS Australia saw also the addition of a new 4.5 inches (114mm) belt, 6ft (1.8m) tall abreast the machinery and transmitting station. It remained “stock” elsewhere. There was also an addition of 4 inches (102mm) internal plating to the sides of boiler room fan compartments. Probably around 1939 a new catapult E-IV-H was installed, powerful enough to launch the Walrus seaplane which was adopted as replacement. At the same time she also gained a single quad 40mm/39 2pdr QF Mk VIII “pompom”. It seems they also lost their saluting guns (Hotchkiss 47mm/40) to make room for extra AA later.
In December 1940, Australia saw the removal of her four single 4-in/45 AA guns as well as her two quadruple 21-in (533mm) torpedo tubes to spare weight for the addition of four twin tuttered standard 4-in/45 QF Mk XVI dual purpose mounts. For the first time she also received a radar, the type 286. After the loss of her sister in October 1942 she saw the replacement of her old single mount pompoms by two octuple 40mm/39 2pdr QF Mk VIII. By late 1943 she lost her four remaining single pompom and two quad Vickers 0.5-in/62 HMG and current radar for seven single mount 20mm/70 Oerlikon Mk II/IV AA guns and her sensor suite was modernized to the type 273 and type 281 radars.
By March 1944, radars made her on board aviation redundant and she lost both catapult and seaplanes. Her Oerlikon guns were replaced by twin mounts Mk II/IV, soubling her light AA firepower. By February 1945 she lost a main turret, aft “X” to spare top weight for the addition of extra AA and new sensors: Two octuple 2-pdr/39 QF Mk VIII AA miuts, two quad US pattern 40mm/56 Bofors Mk 1.2, two twin 40mm/56 Bofors Mk 1.2, and two single mount 40mm/56 Bofors Mk 1.2, as well as the type 284 and type 285 radars. Later in 1945 all her Oerlikon guns were removed.
HMAS Canberra on her side was only modifed in early 1941, with the addition of four extra 4-in/45 QF Mk V guns and the same radar as her sister, the Type 286. By June 1942 so before her loss, she saw the removal of all four single 40mm/39 pompom for the addition of two extra octuple 2pdr QF Mk VIII pompom mounts, and five single 20mm/70 Oerlikon Mk II/IV.
In 1945 apart the twin main gun turrets that never changed apart for their fire control, Australia ended with three, turrets, not four. Canberra never had this modification as she sank in action. Ausralia ended the war with four twin mounts with 4-inch guns, eight 40 mm Bofors guns. It’s dubious as seen in some sources she kept four quad .303-inch machine guns and 3-pounder 47mm/40 Hotchkiss Mk I saluting guns.
 HMAS Australia
HMS Australia in October 1937
HMS Australia after commission, last trials and preparations left Portsmouth on 3 August 1928 and along the way east, she visited Canada, the United States of America, went through the Panama canal and stopped in several several Pacific islands, before reaching New Zealand and then Sydney on 23 October. Little is known about her service in 19929-30 but due to the Great Depression, the RAN fleet was downscaled in 1930. It was decided to keep only the new susters Australia, Canberra, and the seaplane carrier Albatross, but a single S-class destroyer. In 1932, HMAS Australia cruised the Pacific and in 1933, she visited New Zealand. On 10 December 1934 she was sent to UK for exchange duty with the Duke of Gloucester for the centenary celebrations.
She arrived in Portsmouth on 28 March 1935 and sent to the Mediterranean Fleet under RN command to be kept to the latest standards in case of war. She then returned home from 21 June to 12 September. She returned to UK for King George V’s Silver Jubilee Naval Review at Spithead however. When the Abyssinian crisis commenced, she was prepared for war. In case the Italian Navy was to prey on HMS Glorious after a planned attack on Taranto. The crisis however abated. She returned to the Mediterranean until 14 July 1936 however and had a memory celebration with veterans at Gallipoli with HMAS Sydney, back on 11 August. HMS Sussex replaced her in the RAN during her Mediterranean exchange.
Late 1936 saw her between Sydney and Jervis Bay, and in Melbourne by November. She returned to New Zealand in April 1937 and by July started a three-month northern cruise to Queensland in New Guinea, and New Britain, then in November back to Melbourne, then Hobart in February 1938, but placed in reserve on 24 April 1938 for a modernisation refit at Cockatoo scheduled for completion in March 1939, but local inconsistencies in supplying drawings caused delays, but she was recommissioned on 28 August, and had fixes until 28 September. When the war commenced she remained in Australian waters. Italy wa snot at war yet and the RN was counting more on the Canadians at that stage.

Both cruisers arrived to meet the Duke of Gloucester on 22 November 1934
From 28 November to 1 December, she was assigned to commerce raider hunting, with her sister Canberra, and the light HMAS Sydney. They were ordered too look after KMS Admiral Graf Spee on the loose in the Indian Ocean. From 10 to 20 January 1940, Australia escorted the Anzac convoy US 1 to Fremantle, and to Colombo, back to Fremantle. She relieved HMAS Adelaide as gard ship for the western coast until 6 February, in turn relieved by HMAS Sydney. She was back to the east coast and 12 May with Canberra left Fremantle with Anzac convoy US 3 to Cape Town and there, reassigned to the RN, albeit she kept escorting convoys in June round southern/western Africa. On 3 July, she escorted HMS Hermes to Dakar, joining her half sister HMS Dorsetshire shadowing the French battleship Richelieu to Dakar. They arrived 5 July, followed by attacks on 7 and 8 July. Australia fired a Vichy French attack aircraft. She left Dakar on 9 July for the River Clyde (16 July) and the 1st Cruiser Squadron in Scapa Flow. Later in July she was off Norway searching for Gneisenau In August with HMS Norfolk she searched around the Faroe Islands, Bear Island.

Through the Panama canal in March 1935
In September, she was assigned to Operation Menace, a second attack on Dakar, replacing HMS Fiji. On 19 September, she relieved HMS Cumberland on patrol off Dakar launched her Walrus which reported three French cruisers. Cumberland shadowed them until dark.One was Gloire, which suffered engine troubles and had to turn back to Konakri, meeting on her way Australia. She proposed her an escort to Casablanca, and Gloire’s captain accepted until the 21st when her captain promised to complete the voyage unescorted. Australia then rushed back to the Allied fleet for an attack on 23 September. Shore batteries barked and there was an attack from two Fantasque-class destroyers. In the afternoon Fury and Greyhound engaged L’Audacieux and put her on fire. On the 24th in poor visibility, Australia started shelling Dakar and ships in the harbour before withdrawing after repelling French high-altitude bombers. On 25 September with HMS Devonshire she was back shelled French ships in Dakar, damaged a destroyer and several cruisers, but taking herself two 6-inch shells. Her Walrus was shot down by AA and crashed, with her crew killed. Operation Menace was abandoned after the 26th and Australia sailed b back to the UK.
By October she escorted troopshipsg from Gibraltar to the United Kingdom and on the 29th she recovered 9 men, from a crashed Short Sunderland off Greenock in a gale. At last she had a refit in Liverpool in the fall, but in a German air raid on 20 December, a 3,500-pound (1,600 kg) torpedo fell into her dry-dock and remained inert. The following night she was damaged by the blast of a 500-pound (230 kg) bomb on her port side, notably loosing her catapult. In January 1941 she escorted Convoy WS5B to the Middle East via South Africa and on the 22th she was relieved by HMS Hawkins off Mombasa and searched for Admiral Scheer, then the auxiliary cruisers (Hilfskreuzer) Pinguin and Atlantis in the Indian Ocean ad headed for Sydney with two troopships. She escorted Convoy US10 to Suez and was back to Singapore picking up Admiral Ragnar Colvin and staff after the Singapore Conference. In June she escorted convoys to the Tasman Sea, ecorted Convoy US11A to Trincomalee in July and was sent to the South Atlantic Station. By November she was sent of the Kerguelen Islands while looking for German commerce raiders and found evidence of enemy activity. She deployed magnetic sea mines there, most of which as still present by 2008. However after the loss of HMAS Sydney in South-east Asia she was recalled there on 3 December with WS12X, relieved by HMS Dorsetshire, arriving off Australia on 29 December. She became the Flagship of the Australian Squadron at the end of 1941.

Arrival of the Governor Admiral Sir Murray and Lady Anderson
On 31 January 1942, Australia and HMNZS Leander left Sydney for Wellington and by February she took the head of the ANZAC Squadron. By March she was sent to shell Gasmata in New Britain but recalled to escort instead USS Lexington and USS Yorktown during the air raid after the attack on Lae and Salamaua. She then sailed for Nouméa in Vichy-French New Caledonia. On 12 March, while underway in the Louisiade Islands she had one stokers stabbed and killed during the night, leading later to a court-martial on 15-18 March while in Nouméa. The captain commutted the death sentences to back home. They would be convicted under British military law until an appeal for clemency by King George VI, commutting it to life imprisonment. Eventualy they were freed by September 1950.
On 22 April, the Anzac Squadron she led became ‘Task Force 44″ but it was in Sydney by late April. Herself was in refit notably with the replacement of her port propeller shaft. With the operation planned on Port Moresby on 1 May, she sailed in emergency with Hobart to meet the US TF in the Coral Sea. At 07:00 on 7 May, Rear Admiral John Gregory Crace on Australia was ordered to take his force (TF 44) comprising also Hobart and USS Chicago, the DDs USS Perkins, USS Walke and USS Farragut to the Jomard Passage to search and destroy Japanese ships underway to Port Moresby. Meanwile the US carrier group engaged the Japanese off the Solomon Islands. On the same day at 15:03 TF 44 was attacked by twelve Japanese Mistubishi G3M “Nell” twin-engine torpedo bombers and Australia and Chicago managed to out-manoeuvre torpedoes while the three cruisers and destroyers downed five of them. At 15:16, they were attacked by another wave of nineteen Japanese heavy bombers, which was accurate, Australia being showered by water from near misses. Then came three heavy bombers at a higher altitude, even less accurate (this was an error from the USAAF). RADM Crace then decided to sent hos force for the night 220 nautical miles from Port Moresby for the interception whether it came from the Jomard Passage or China Strait. Without orders, he relied on intercepted radio messages and remained until 01:00 on 10 May, then sailed south to Cid Harbour, Whitsunday Island. It seemed Port Moresby had been saved. Indeed in between the double miracle of the Coral Sea and Midway changed history.

HMAS Australia 31 August 1942
On 13 June, Crace was replaced by RADM Victor Crutchley at the head of TF 44, still on Australia. On 14 July, she sailed to Wellington with the amphibious assault force intended for Guadalcanal. They left for Fiji on the 22th July and trained at Koro Island on 28-31 July and met three carrier groups and more transports south of Fiji on 1 August, and headed for the Solomon Islands, in position on 6 August. Australia led “Squadron X” (5 cruisers, 9 destroyers, 9 transports, 6 store ships) at the main landing site, north of Guadalcanal. On 7 August, Squadron X transited between Guadalcanal and Savo Island, and arrived at Lunga Point at 06:47, firing on shore targets before a coordinated bombardment, and the first wave hit the beach at 08:00. Despite the air support, Japanese air attacks commenced at 13:23; all driven off. All feared a night attack, the Japanese mastered well.
Crutchley split his forces around Savo Island. Australia, Canberra, Chicago, and two destroyers went to the southern waters, a second group the northern passage, and the rest used as picket ships. Nothing happened on 7–8 August, but on 8 August at 20:45, Crutchley was recalled to meet US Admiral Richmond K. Turner on USS McCawley to organized their withdrawal led by Australia albeit this night she patrolled around the transports when around 02:00, a six-ship Japanese task force fell on the southern group and crippled her sister Canberra s well as sinking the New Orleans class USS Quincy, Vincennes, Astoria were lost in the next attack on the northern patrol force. After the transports completed unloading, the withdrawal commenced on 9 August and Australia was back at Nouméa on 13 August where TF 44 replenished, then sailed to join the three carrier groups on 19 August, after intel from the Solomon Islands. On 21 August, Crutchley and Australia were included in a new TF including several cruisers and USS North Carolina. On 31 August, TF 44 was detached and headed for Brisbane on 3 September, before returning to Milne Bay but failed to make contact and was later assigned to patrol the Coral Sea.
This dull job ended by 10 January 1943 and TF 44 was split into smaller groups with two rapid response forces, and another with Australia and three US destroyers to Moreton Bay, at first for exercises. By early February, she returned to Sydney and a quick refit and modernization. On 17 February she was sent to join the 9th Division convoy from the Middle East, conducted to the Great Australian Bight and Sydney on the 27th. On 15 March her unit became TF 74, under the US 7th Fleet. On 11 April she went pztrolling the Gulf of Carpentaria and their patrol routine went on until 29 June, sent to patrol the sea lines of communication in the Coral and Arafura seas, and escort passing by transports. Next she was sent to Espiritu Santo to reinforce the 3rd Fleet after the loss of four cruisers for the New Georgia Campaign, starting on 16 July. On 20 July, HMAS Hobart was torpedoed underway by a submarine. Men were rescued.
By October she was back home sole remaining vessel of TF 74, until joined by USS Bagley on 13 October. They proceeded to Milne Bay ro intercept a Japanese return after the fall of Finschhafen, that never came. They head to Brisbane on 21 October. The force there now comprised two cruisers and four destroyers adn returned to Milne Bay, then Port Purvis (Florida Island, Solomons) on 11 November as support for Bougainville invasion, albeit they returne to Milne Bay two days later to add a new US cruiser to their group and on 15 December 1943 covered the landings at Arawe, in pre-landing bombardment. Australia led the Cape Gloucester operation from Milne Bay on 25 December and started the preparatory shelling on the next day for two-and-a-half-hour, notably devastating the airstrip. She then headed for Buna.

By January 1944, she was back to Milne Bay, then Sydney on the 12th for an eight-week refit and R&R for the crew. Captain Farncomb was replaced by Emile Dechaineux and on 7 February, Crutchley chose instead HMAS Shropshire as Flagship, albeit until 21 March, and back to Australia when TF 74 reutned at Milne Bay. On 20 April she met with three other task forces from the 7th Fleet off Manus Island for the landings at Aitape (Humboldt Bay) and Tanahmerah Bay. Bombardment started on 22 April at 06:00, followed by a first wave of the 24th Infantry Division. Australia search along the coastline and destroyed several Japanese barges and supply dumps and sailed for Hollandia in support for new landings, making it into Seeadler Harbour on 4 May and back to Tanahmerah Bay on 16 May with troopships to Wakde Island in company of TF 75. On the 17th she shelled objectives at Sawar and Sarmi in the Battle of Wakde, with a retreat to supply at Humboldt Bay. On 25 May her unit became TF 77.2. She became fire support at Biak on 27 May. On 1 June she was ordered to return to Humboldt Bay, combining forces with TF 75 northeast of Biak on 4 June. Japanese dive-bombers fell on Australia but she repelled them, undamaged. On 6 June she resupplied at Humboldt Bay and back on the 7th. Later an aircraft reported three destroyers towing landing barges, three more destroyers escorting. They had radar contact at 23:19 and at 23:31, the IJN destroyers fired torpedoes, Crutchley ordering hos own destroyers to close and attack while Australia and the other cruisers turned on them. The Japanese cast off their barges and fled, with a chase lasting until 02:30 on 8 June.
On 12 June, she was in Seeadler Harbour. Crutchley completed his assignment waqs replaced by Commodore John Augustine Collins (Yes, this collins), tajing the head of TF 75 and 74, still young and the first graduate of the RAN College in overall command of the entire RAN. On 24 June 1944 both Task Forces sailed for a new operation, and on 2 July led a pre-landing shore bombardment on Noemfoor Island. On 12 July, Australia led TF 74 to Aitape also for naval gunfire. On 14 July, same on the Yakamal area and Marubian area on the 17th, and back to Yakamal on 20 July. On 22 July Collins transferred his flag to Shropshire so that Australia, escorted by HMAS Warramunga could have her overhaul in Sydney, completed on 26 August. She retook later the head of TF 74/75 in Seeadler Harbour on 1 September with Collins on Australian again on the 3rd. Next were the Morotai landings in TG 75.2. She shelled Cape Gila but nearly showered USS Fletcher, positioned to cover the landings from the other side of the cape with shrapnel. She left on 16 September to Mios Woendi until 27 September, then Manus Island, for exercises, visited by Admira Lord Roger Keyes. TF 74 was absorbed on 11 October into TU 77.3.2. She was to take part in the battle of Leyte, from Hollandia. At 15:30 on 13 October, TG 77.3 started her 7-days trip to the Philippines and Leyte. At 09:00 on 20 October she started her shelling but at 06:00 on 21 October, Japanese aircraft arrived over Leyte Bay. One Aichi D3A near-missed Shropshire. After breazking to avoid AA she hot the port side of Australia, striking her foremast,with the bridge and forward superstructure showered with debris and burning fuel, killing 7 officers (including Captain Dechaineux) and 23 sailors, wounding 9 officers (including Collins), 52 sailors. Commander Harley C. Wright assumed temporary control. There was debate postwar to determine if this was a kamikaze attack, but this was the most serious combat damage of the war so far for HMAS Australia.

Kamikaze Damage in 1945
She sailed for Kossol Passage escorted by HMAS Warramunga and USS Honolulu (also damaged), Richard P. Leary back to Manus, then Espiritu Santo for repairs, completed by 28 November. She was then back to TU 74.1 on 4 December 1944 and Cdr Farncomb relieved Collins. In January 1945 she was part of TG 77.2, supporitng the invasion of Lingayen Gulf from 3 January, and she was designated to cover the landings at San Fabian despite a series of kamikaze attacks. Australia was struck port amidships at 17:35 on 5 January with 25 men killed, 30 wounded, albeit physical damage wa slimited and she remained in operations, reaching the gulf on 6 January, commencing operations at 11:00. She was hit by another kamikaze at 17:34 close to the starboard 4-inch guns (14 killed, 26 wounded). Personnel lacked to man just one remaining 4-inch gun either side. Another attack on 18:28 failed as the Kamikaze was shot down by USS Columbia, itself damaged. Next Australia was called for counter-battery on 7 January. On the 8th she faced two Kamikaze attacks, at 07:20 (near missed by a 2-engine bomber but damaging her port flank, and a second at 07:39, shot down short of hitting her port side, waterline, but it dropped a bomb that opened a 14-by-8-foot (4.3 by 2.4 m) gush close to the waterline and flooded, she took a 5-degree list.
Despite this, damage was controlled and she resumed her bombardments until the amphibious assault. The same day at 13:11, she was struck by a 5th Kamikaze aiming at her bridge, but hitting a mast strut, bounced on the forward exhaust funnel, fell overboard (no casualties) but damage was extensive, including the wireless systems, so she was asked to withdraw for repairs, departing on the evening of 9 January. Temporary repairs (Farncomb made HMAS Arunta his flagship and returned) and the battered cruiser sailed to Sydney via Manus for permanent repairs and refit from 28 January, entering Cockatoo until 17 May, underway on the 24th for England via Panama, Plymouth on 2 July, for her final drydock refit until December. The war ended in between. She collected the battle honours “Atlantic 1940–41”, “Pacific 1941–43”, “Coral Sea 1942”, “Savo Island 1942”, “Guadalcanal 1942”, “New Guinea 1942–44”, “Leyte Gulf 1944”, and “Lingayen Gulf 1945” making her likely the most battle-hardened Australian cruiser of WW2.

HMS Australia back home in 1946

Australia in October 1953
Post-war started with a hero’s welcome at Sydney on 16 February 1946, and reserve until her refit could be completed with the last arriving parts from Britain. On 16 June 1947, recommissioned, she retook the role of flagship of the Australia Squadron. On 18 August she sailed to Tokyo with the Commonwealth Occupation Force and was back home on 10 December. She visited New Zealand in 1948, New Guinea in 1949, and remained in home waters but by 1949, the new Flagship was the carrier HMAS Sydney. In 1950, she became a training ship, with new visits to New Zealand (24 February to 31 March) and sent to Heard Island in late July to collect the island’s doctor having an appendicitis, and transport him to the mainland, reachinh Fremantle on 14 August. By May 1951, she transported the governor of New South Wales Sir John Northcott for jubilee celebrations and in July, visited New Caledonia.
In 1952 she visited New Guinea, New Britain, the Solomon Islands, making a training cruise to New Zealand until 6 October. In February-March 1954 she escorted the Royal Yacht Gothic with Queen Elizabeth II for her coronation world tour. In May she transported the Governor-General Sir William Slim and family on a cruise of the Coral Sea, seeing the Great Barrier Reef and Whitsunday Passage and rescuing a disabled Dutch landing ship. On 31 August 1954, the proud veteran was paid off, written off for disposal after 26 years in service, a record for any RAN warship so far. She was sold for BU on 25 January 1955 to British Iron & Steel Corp. towed on 26 March from Sydney by the tugboat Rode Zee to Barrow-in-Furness via Suez, arriving on on 5 July and scrapped at Thos. W. Ward in 1956. On 8-inch gun barrel is now displayed at the Australian War Memorial.
HMAS Canberra

HMAS Canberra left Portsmouth on 4 December 1928 after commission and months of workup trials for Sydney, and arrived on 16 February 1929. She remained in Australian waters for ten years and replaced her sister in refit as RAN flagship a few times. On 20 September 1929 she was part of the round-Australia cruise when grounding on a sand shoal off Roebuck Bay (Western Australia). Damage was light and she was only repaired in early 1930. By September 1931 she visited New Caledonia and Fiji and was sent to the Royal Navy’s China Station in 1932 and 1937. In 1934 she escorted HMS Sussex hosting the the Duke of Gloucester in a visit to Australia. By August 1936 she carried Admiral Sir Murray Anderson to Sydney as he was invested as Governor of New South Wales.

Canberra entering Sydney Harbour on 6 August 1936. The cruiser is carrying Admiral Sir Murray Anderson, who was to be invested as Governor of New South Wales.
The nine months of World War II she patrolled home waters, escorted convoys, and by January 1940, the first troopship convoy, Anzac Convoy US 1 to the Middle East. In May, she joined her sister for Anzac Convoy US 3 in the Indian Ocean but diverted to the Cape of Good Hope since it was feared Italy was about to join the war. On 26 June, Canberra returned to the Indian Ocean as convoy escort between Fremantle, Colombo, and Cape Town and by November, she looked for the German merchant raider Atlantis. When SS Maimoa signalled she was under attack by a German merchant raider (Pinguin), the cruiser departed but wa sunable to find Maimoa or the raider; only three lifeboats on 22 November with all 27 sailors from SS Port Brisbane (also from Pinguin). Next she was directed to the East Indies Station.


In February 1941, she looked for the Admiral Scheer. By early March, she met two merchant ships, a suspicious tanker that could supply her, and another supply vessel that fled when challenged. She chaased the first and fired from maximum range, her Walrus took off and tried to signal the tanker to stop by dropping bombs. Eventually they happened to be the raider supply ship Coburg andcaptured Norwegian tanker Ketty Brøvig, which both commenced scuttling after the first attack. The Walrus dropped all its bombs, Canberra fired 215 shells but missed and the captain was criticized post-operations for his management as one of the two could have been captured. Canberra returned to Australia in July, patrolled the western and southern coasts and stopped in Sydney in December 1941, soon learning about the Japanese attack. She returned to convoy escort around New Guinea and Malaysian, Javanese waters. By 12 December she met the Pensacola Convoy, under Rear-Admiral John G. Crace in Brisbane on the 15th and departed with HMAS Perth for New Caledonia to meet HMNZS Achilles and the convoy.
In January 1942, Canberra and HMAS Vampire escorted the troopship Aquitania from Sydney on 10 January to Singapore, Ratai Bay, Sunda Strait. Next she escorted convoy MS.2A with Dutch KPM vessels and one British vessel to Singapore, arriving on 24 January and while back through the Dutch East Indies she was reassigned to the ANZAC Squadron. She had a refit in Sydney February-May 1942, becoming the first fitted with a Type 241 surface search radar and A290 air-warning set. She was still in Sydney during the Japanese midget submarine attack on 31 May. At 04:40 that night Canberra noted torpedoes fired at her whhich proved false alarms. Next in June-July she joined the ANZAC Squadron (Task Force 44) for patrols in the Coral Sea starting on 17 June, then Operation Watchtower, the preparations for the Guadalcanal campaign and the landings at Tulagi from 5 August, screened the force on 7-8 August


In the afternoon of 8 August, a Japanese task force under VADM Gunichi Mikawa (five cruisers and a destroyer) approached south of Savo Island, to attack the landing force at Tulagi. This was anticipated by the Allied commander RADM Victor Crutchley, which split his forces around Savo. Himself was aboard HMAS Australia, follwoed bu Canberra, USS Chicago, USS Patterson and USS Bagley, patrolling the southern waters. At 20:45, Crutchley was recalled to meet US Admiral Richmond K. Turner,. Chicago became the senior ship after Australia departed and remained with Canberra and at 01:00 on 9 August, Japanese scout planes were heard. At 01:45, Patterson detected Mikawa’s ships, alerted the Allies, while the scout planes dropped flares to light up Canberra and Chicago. Spotters of the first warned about torpedo trailed approaching fast and she manoeuvered hard and dodged them. The battle of Savo had started. Gunfire started in between and just as she started doidging the torpedoes she was hit by a first two salvos that killed or wounded several senior officers and disabled both engine rooms. The bridge was wrecked and she lost a 4-inch gun. One 8-inch (203 mm) magazine had to be flooded. In two minutes, she received 24 hits and was already dead in the water and listing to starboard. Fires were everywhere and she ha a fifth of her crew incapacitated. Next wave of torpedoes missed out of 19 fired at her by the cruisers. When the situation calmed down a bit the XO registered 84 men killed (74 in the battle, 10 later from wounds), 109 wounded.
At 03:30, USS Patterson came alongside, relayed orders from Rear Admiral Turner that if she was not on the move by 06:30, she would be abandoned and scuttled. She took on moslt wounded survivors first but at 04:30, she detected an approaching ship and had todepart moved to investigate. The first opened fire, Patterson retaliated until both realized the mistake as the “attacker” was USS Chicago which mistaken Canberra for a damaged Japanese cruiser. Both eased fire and Patterson returned to continue the evacuation later joined by USS Blue. Damage control and repair did wonders mennawhile, but it was evaluated her engines could not be repaired by the 06:30 deadline so preparations to have her scuttled, not towed to Tulagi started. Cock where opened, a charge setup and after fiull evacuation she was torpedoed by USS Ellet at 08:00 for good measures after the destroyers fired at her 263 5-inch (127 mm) shells. The first four torpedoes from USS Selfridge failed indeed (reminder: They were Mark 14). She sank, one of the first wreck of “Ironbottom Sound”, later joined by three US cruisers while a destroyer had been damaged in the same battle.

Canberra sinking on 9 August 1942, assisted by destroyers
Captain Howard Bode (USS Chicago) was formally criticised for his actions, not taking the lead after Australia departed, not warning the northern force of the approaching Japanese. Inversely, US President F. Delano Roosevelt wanted to commemorate the loss of HMAS Canberra and bravrey of his crew by naming a Baltimore class cruiser after her, Pittsburgh. USS Canberra, launched on 19 April 1943 by (Alice,) Lady Dixon, the wife of Sir Owen Dixon (Australia’s US ambassador) became the only US warship named after a foreign city. In 2023 this was the turn of an Independence-class LCS. The British in 1942 announced she would be replaced by HMS Shropshire, a sister ship of the London subclass, transferred as a gift. The Australian government decided to retain her name after leaning about the decision of President Roosevelt. Thus HMAS Shropshire by early 1943 had a crew made of most Canberra survivors. She had the four battle honours “East Indies 1940–41”, “Pacific 1941–42”, “Guadalcanal 1942”, and “Savo Island 1942”. Her wreck was rediscovered and examined by Robert Ballard in the summer 1992 upright under 2,500 feet (760 m), her hull basically intact, with signs of shell hits and fire damage, three turrets were trained to port, “A” turret to the port bow. The forward superstructure had collapsed starboard and B turret roof was missing. Back in Australia many memorials were erected. Other ships sported her name, a Knox(Adelaide) class Frigate and of course the Spanish-built LPD of 2011.
Links/sources

A shipbucket rendition of Australia (pinterest)
Books
Conway’s all the world’s fighting ships
2009 report for the Cole Inquiry “frauds, conspiracies and speculations” about the loss of Sydney
Colledge, J. J.; Warlow, Ben (2006) [1969]. Ships of the Royal Navy: The Complete Record of all Fighting Ships. Chatham Publishing.
Frame, Tom (1993). HMAS Sydney: Loss and Controversy. Rydalmere, NSW: Hodder & Stoughton.
Raven, Alan; Roberts, John (1980). British Cruisers of World War Two. Annapolis, MD: Naval Institute Press.
Links
www.navypedia.org
pacificwrecks.com
seapower.navy.gov.au
1928 J. Brown Ltd. Plans in the greenwich coll. not scanned yet.
navyhistory.au/ reconstructed plans
britmodeller.com
world-war.co.uk
HMAS_Australia_(D84)
HMAS_Canberra_(D33)
navweaps.com 8-in guns
Videos
Model Kits
modelshipworld.com
Royal Australian Navy Heavy Cruiser HMAS Australia – 1928 Combrig 1:700
Royal Australian Navy Heavy Cruiser HMAS Canberra – 1928 Combrig 1:700
HMAS Canberra Conversion for Trumpeter 1/350 HMS Kent kit Kraken Hobbies
modellmarine.de
flickr.com
britmodeller.com